Extend Your Reading!
Frostfire - Fox Puppet!


My mom, Joan Irvine came up with this! You can make a fox puppet with an envelope So simple and so smart. Or make 2 (Celeste and Miriam!)
Cut the bottom corners from your envelope in a bit of a curve.
Cut the bottom open.
Then, glue or tape the cut off corners to the back of the envelope (at the top) to form ears!
On the envelope flap draw a fox face (nose, eyes and whiskers).
Colour and decorate however you wish. You can make the fox ‘talk’ by putting a finger under the nose.
The Enchanted Symphony - An Imaginary Garden
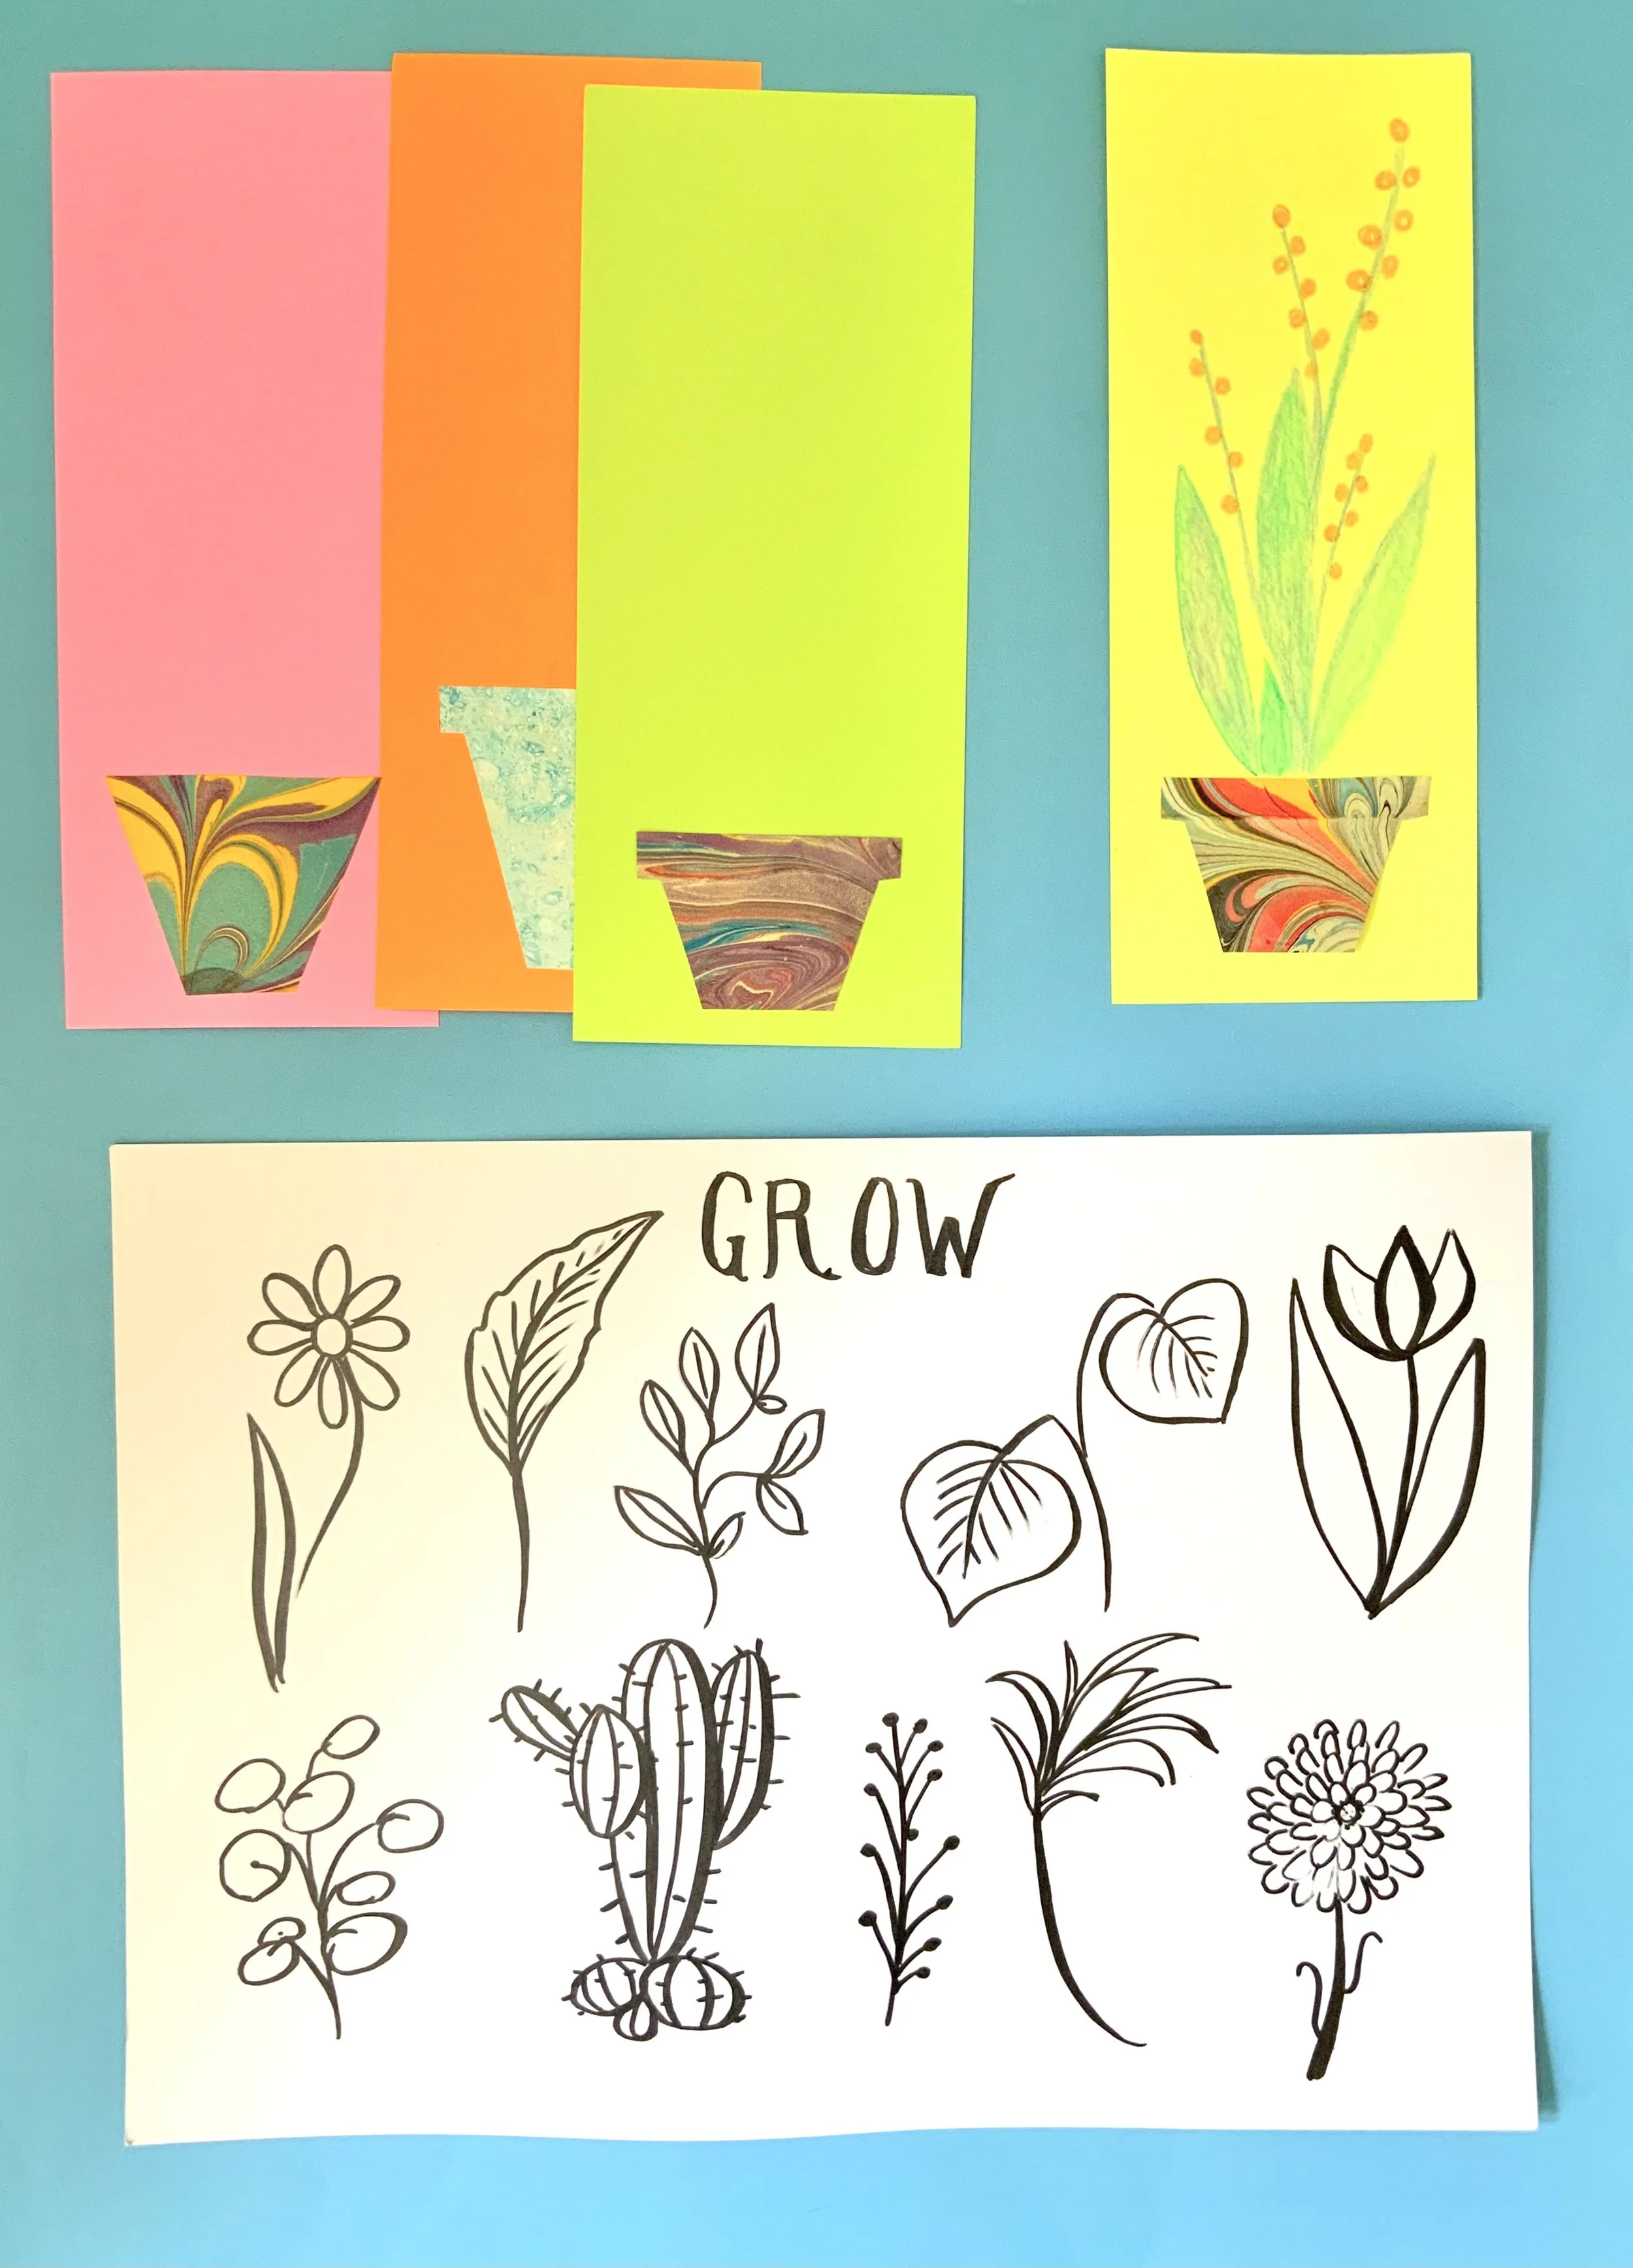
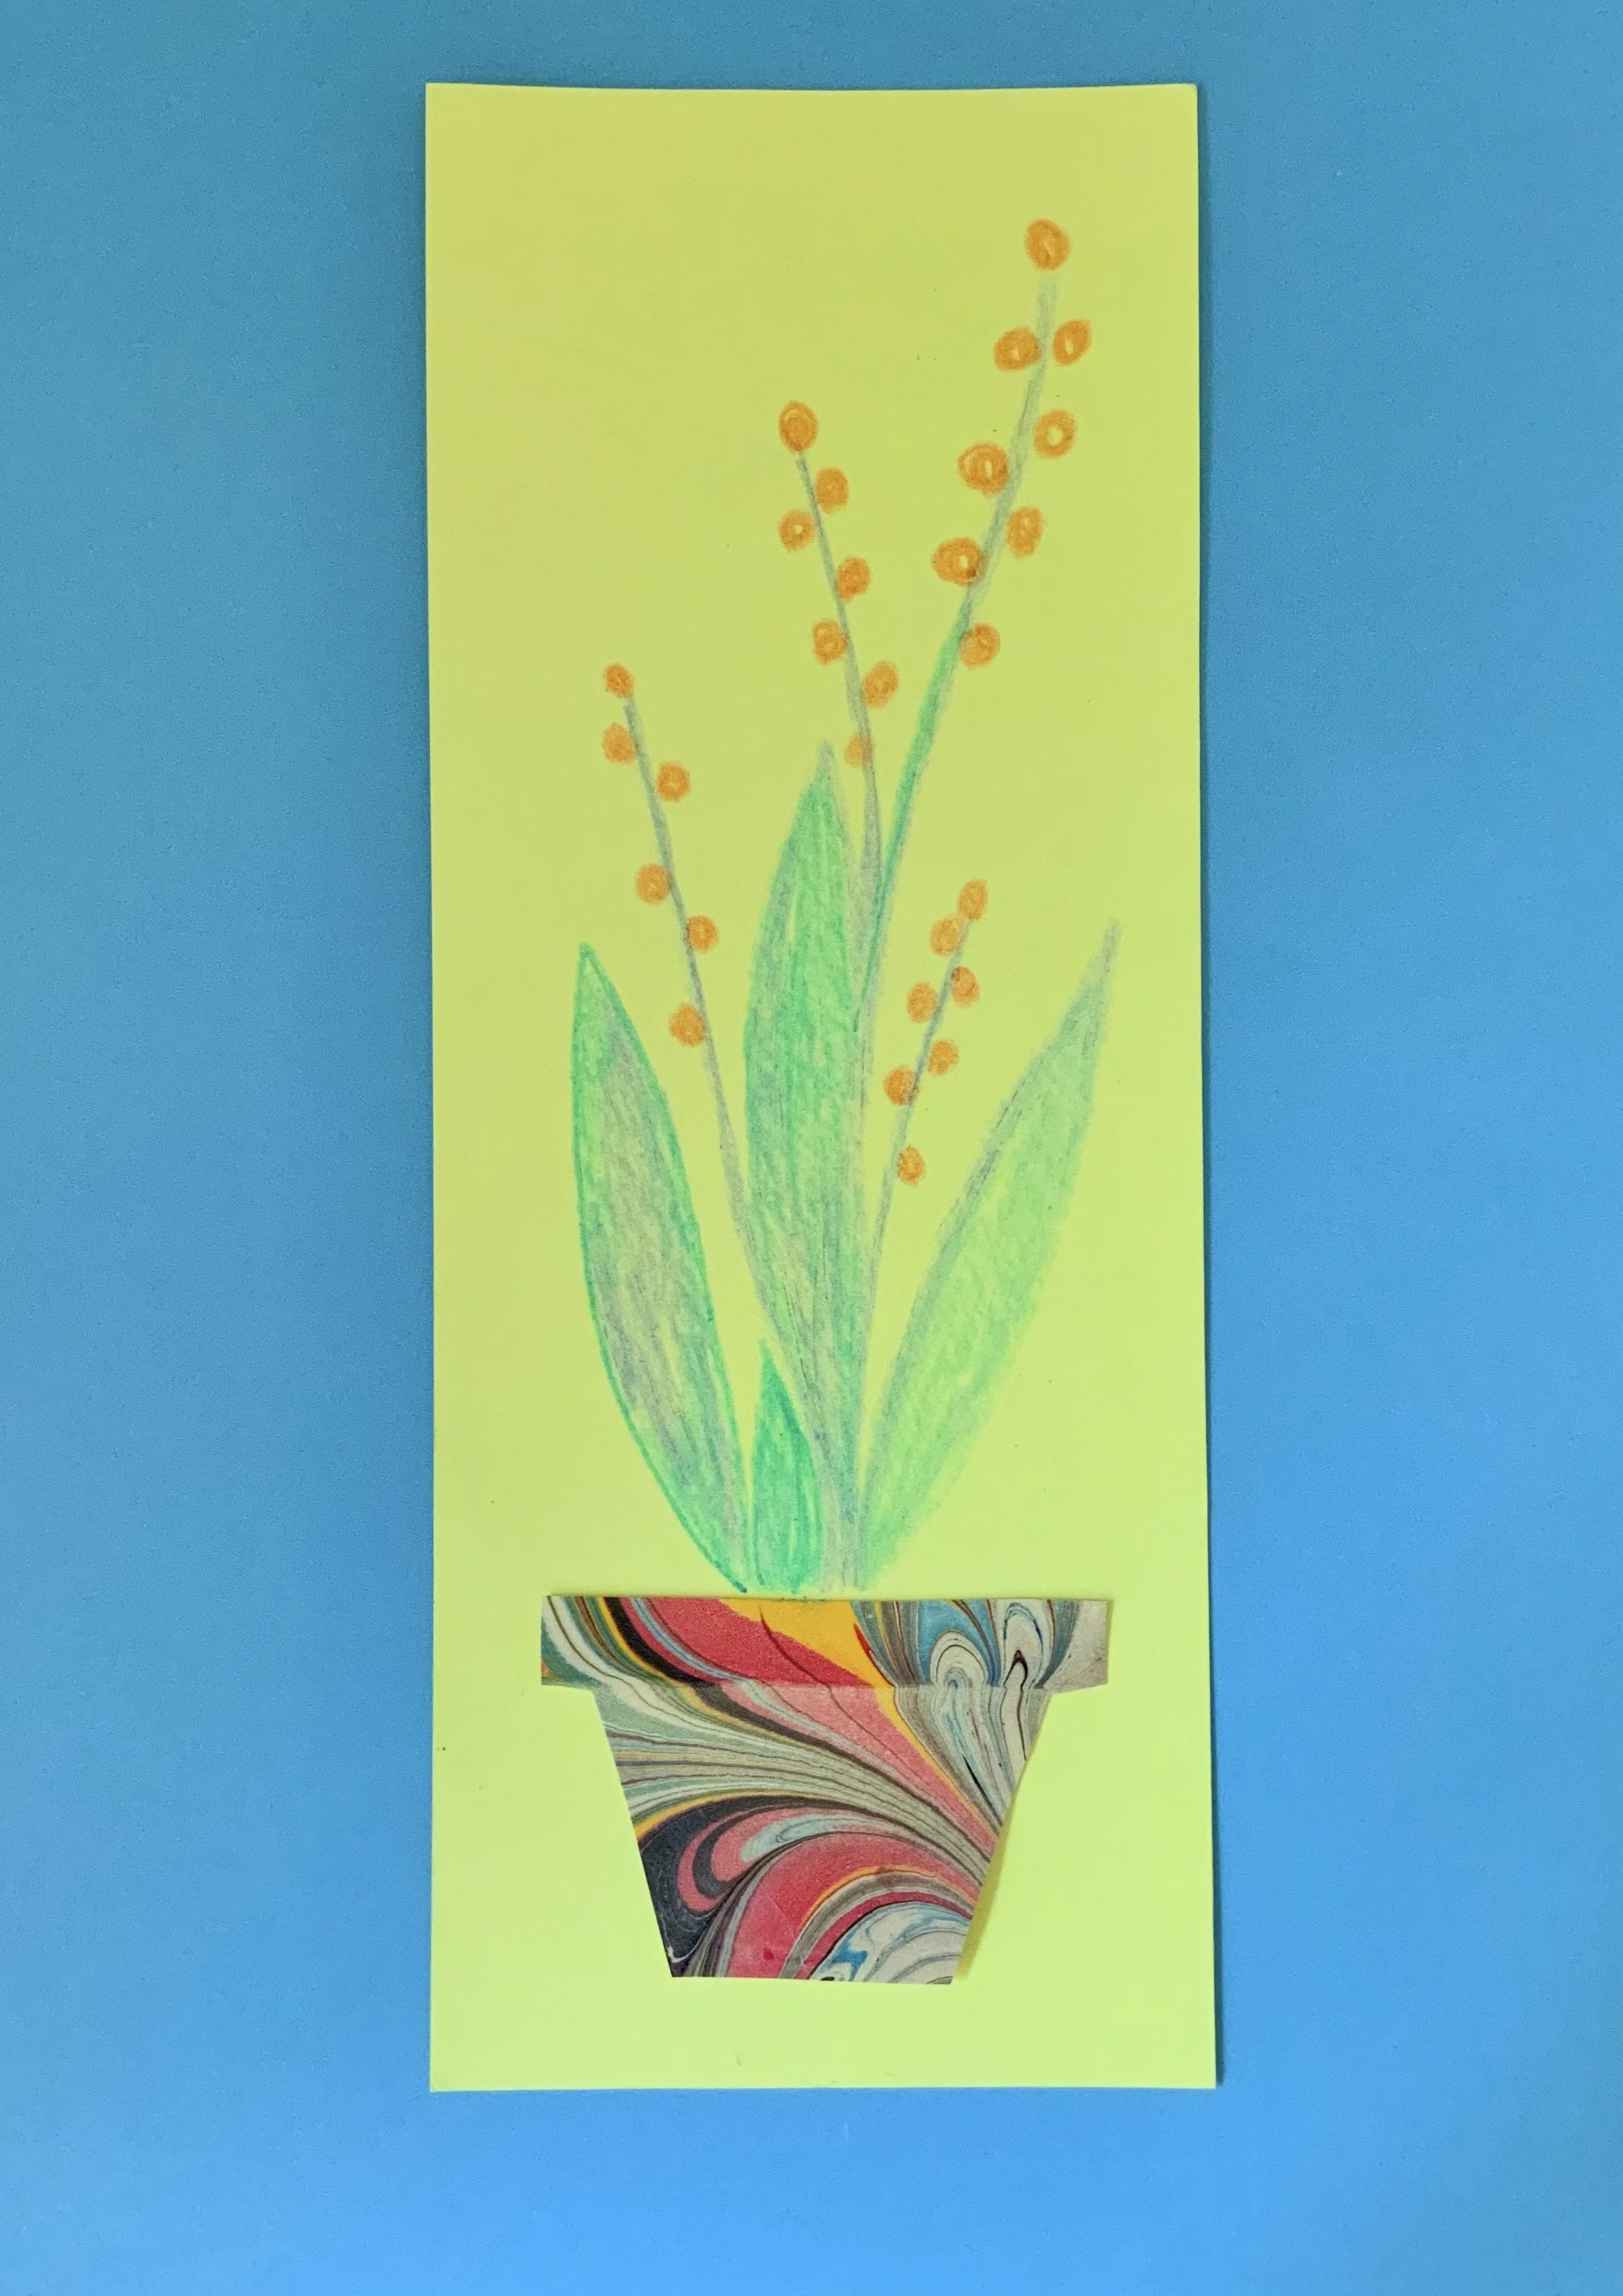

I love listening to music and just letting my pencil wander. I sometimes do this with groups of children too, asking them to draw or paint and respond to the music. I was working with groups of Grade 1s and Kindergarteners and came up with this simple activity. After reading The Enchanted Symphony, I put on some classical music and showed them how diverse different plant forms could be. I then gave them a piece of colourful paper with a little pot cut out in a contrasting paper and asked them to just freely let a plant grow from their imagination. The results were so beautiful and unique and individual to the child. Together, all the flower pots formed a paper garden. So pretty and they were so proud. To prepare for the activity I cut coloured paper lengthwise in half and then cut out one flower pot shape as a guide that I used with a stack of scraps and cut through several layers. I glued the pots on and then gave the kids crayons.
*I believe we listened to The Carnival of the Animals by Camille Saint-Saëns (a fun one for children).
In The Clouds - Question Diorama


Leo made this awesome diorama after reading In The Clouds. I thought it might inspire people to make their own.
All you need is a shoe box, tape, paper clips, markers and scissors.
Trick: If you open a paper clip into an L shape, you can tape half to the box and half to your paper element to make them stand up.
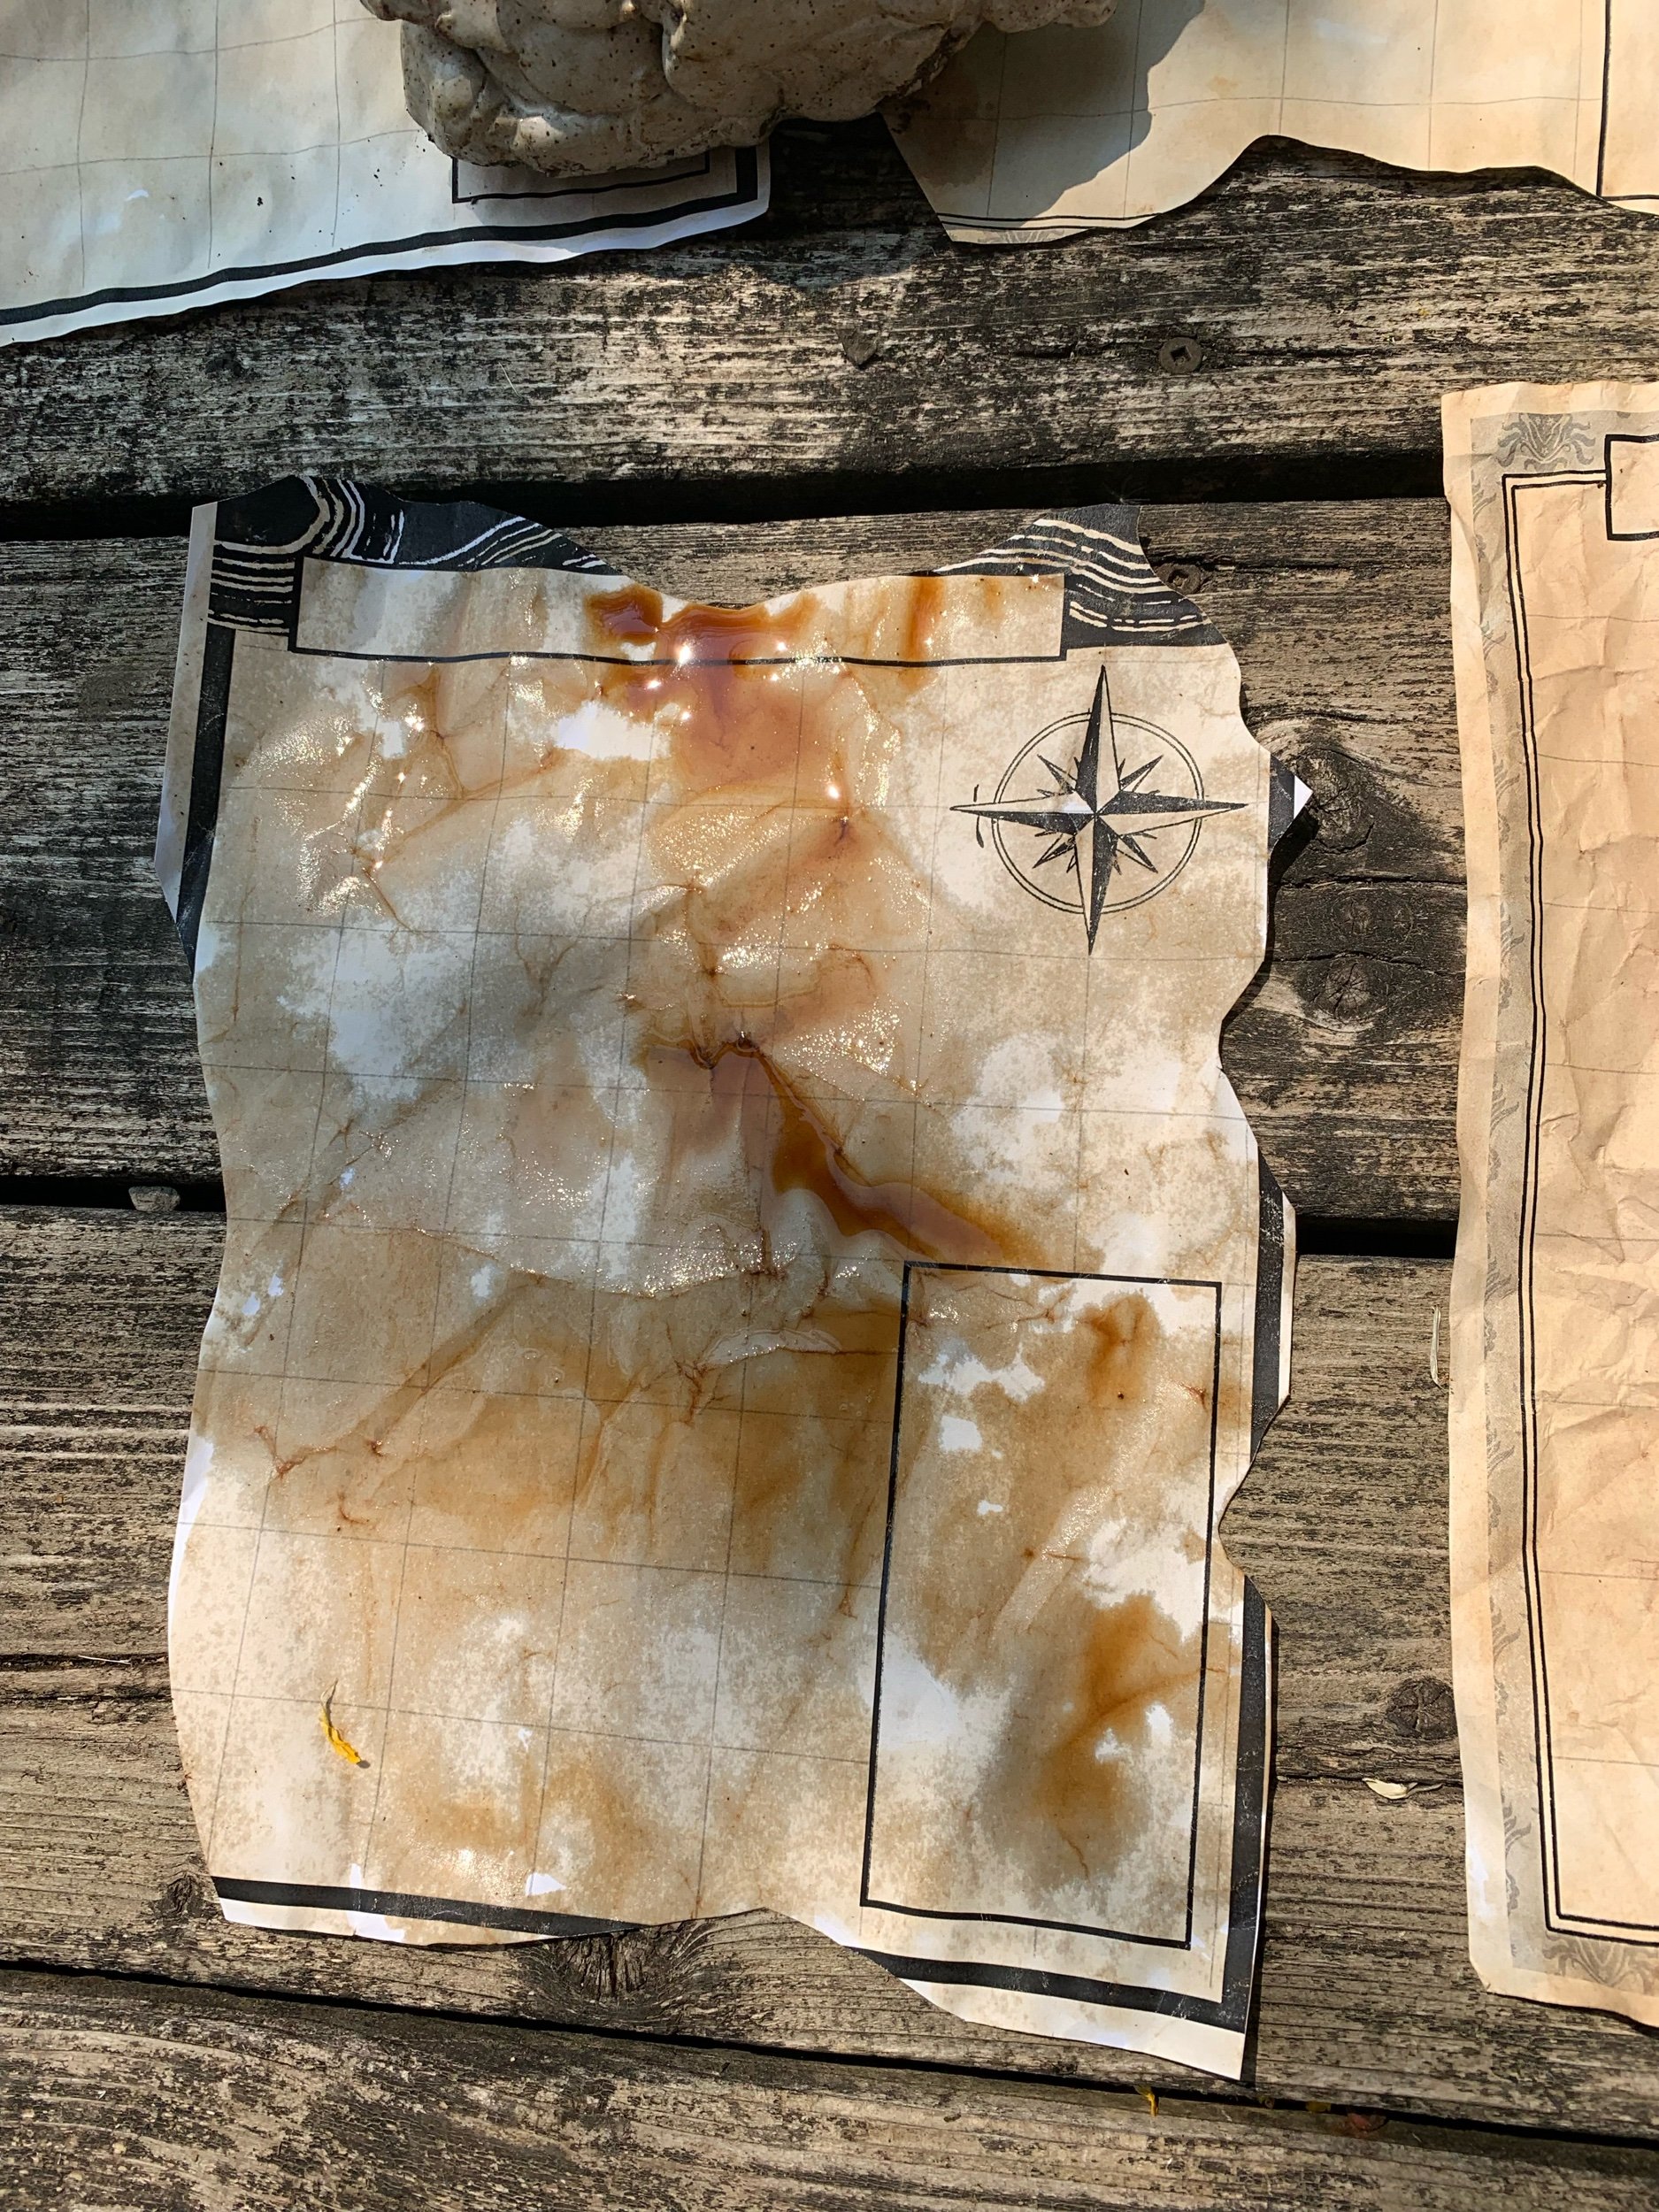
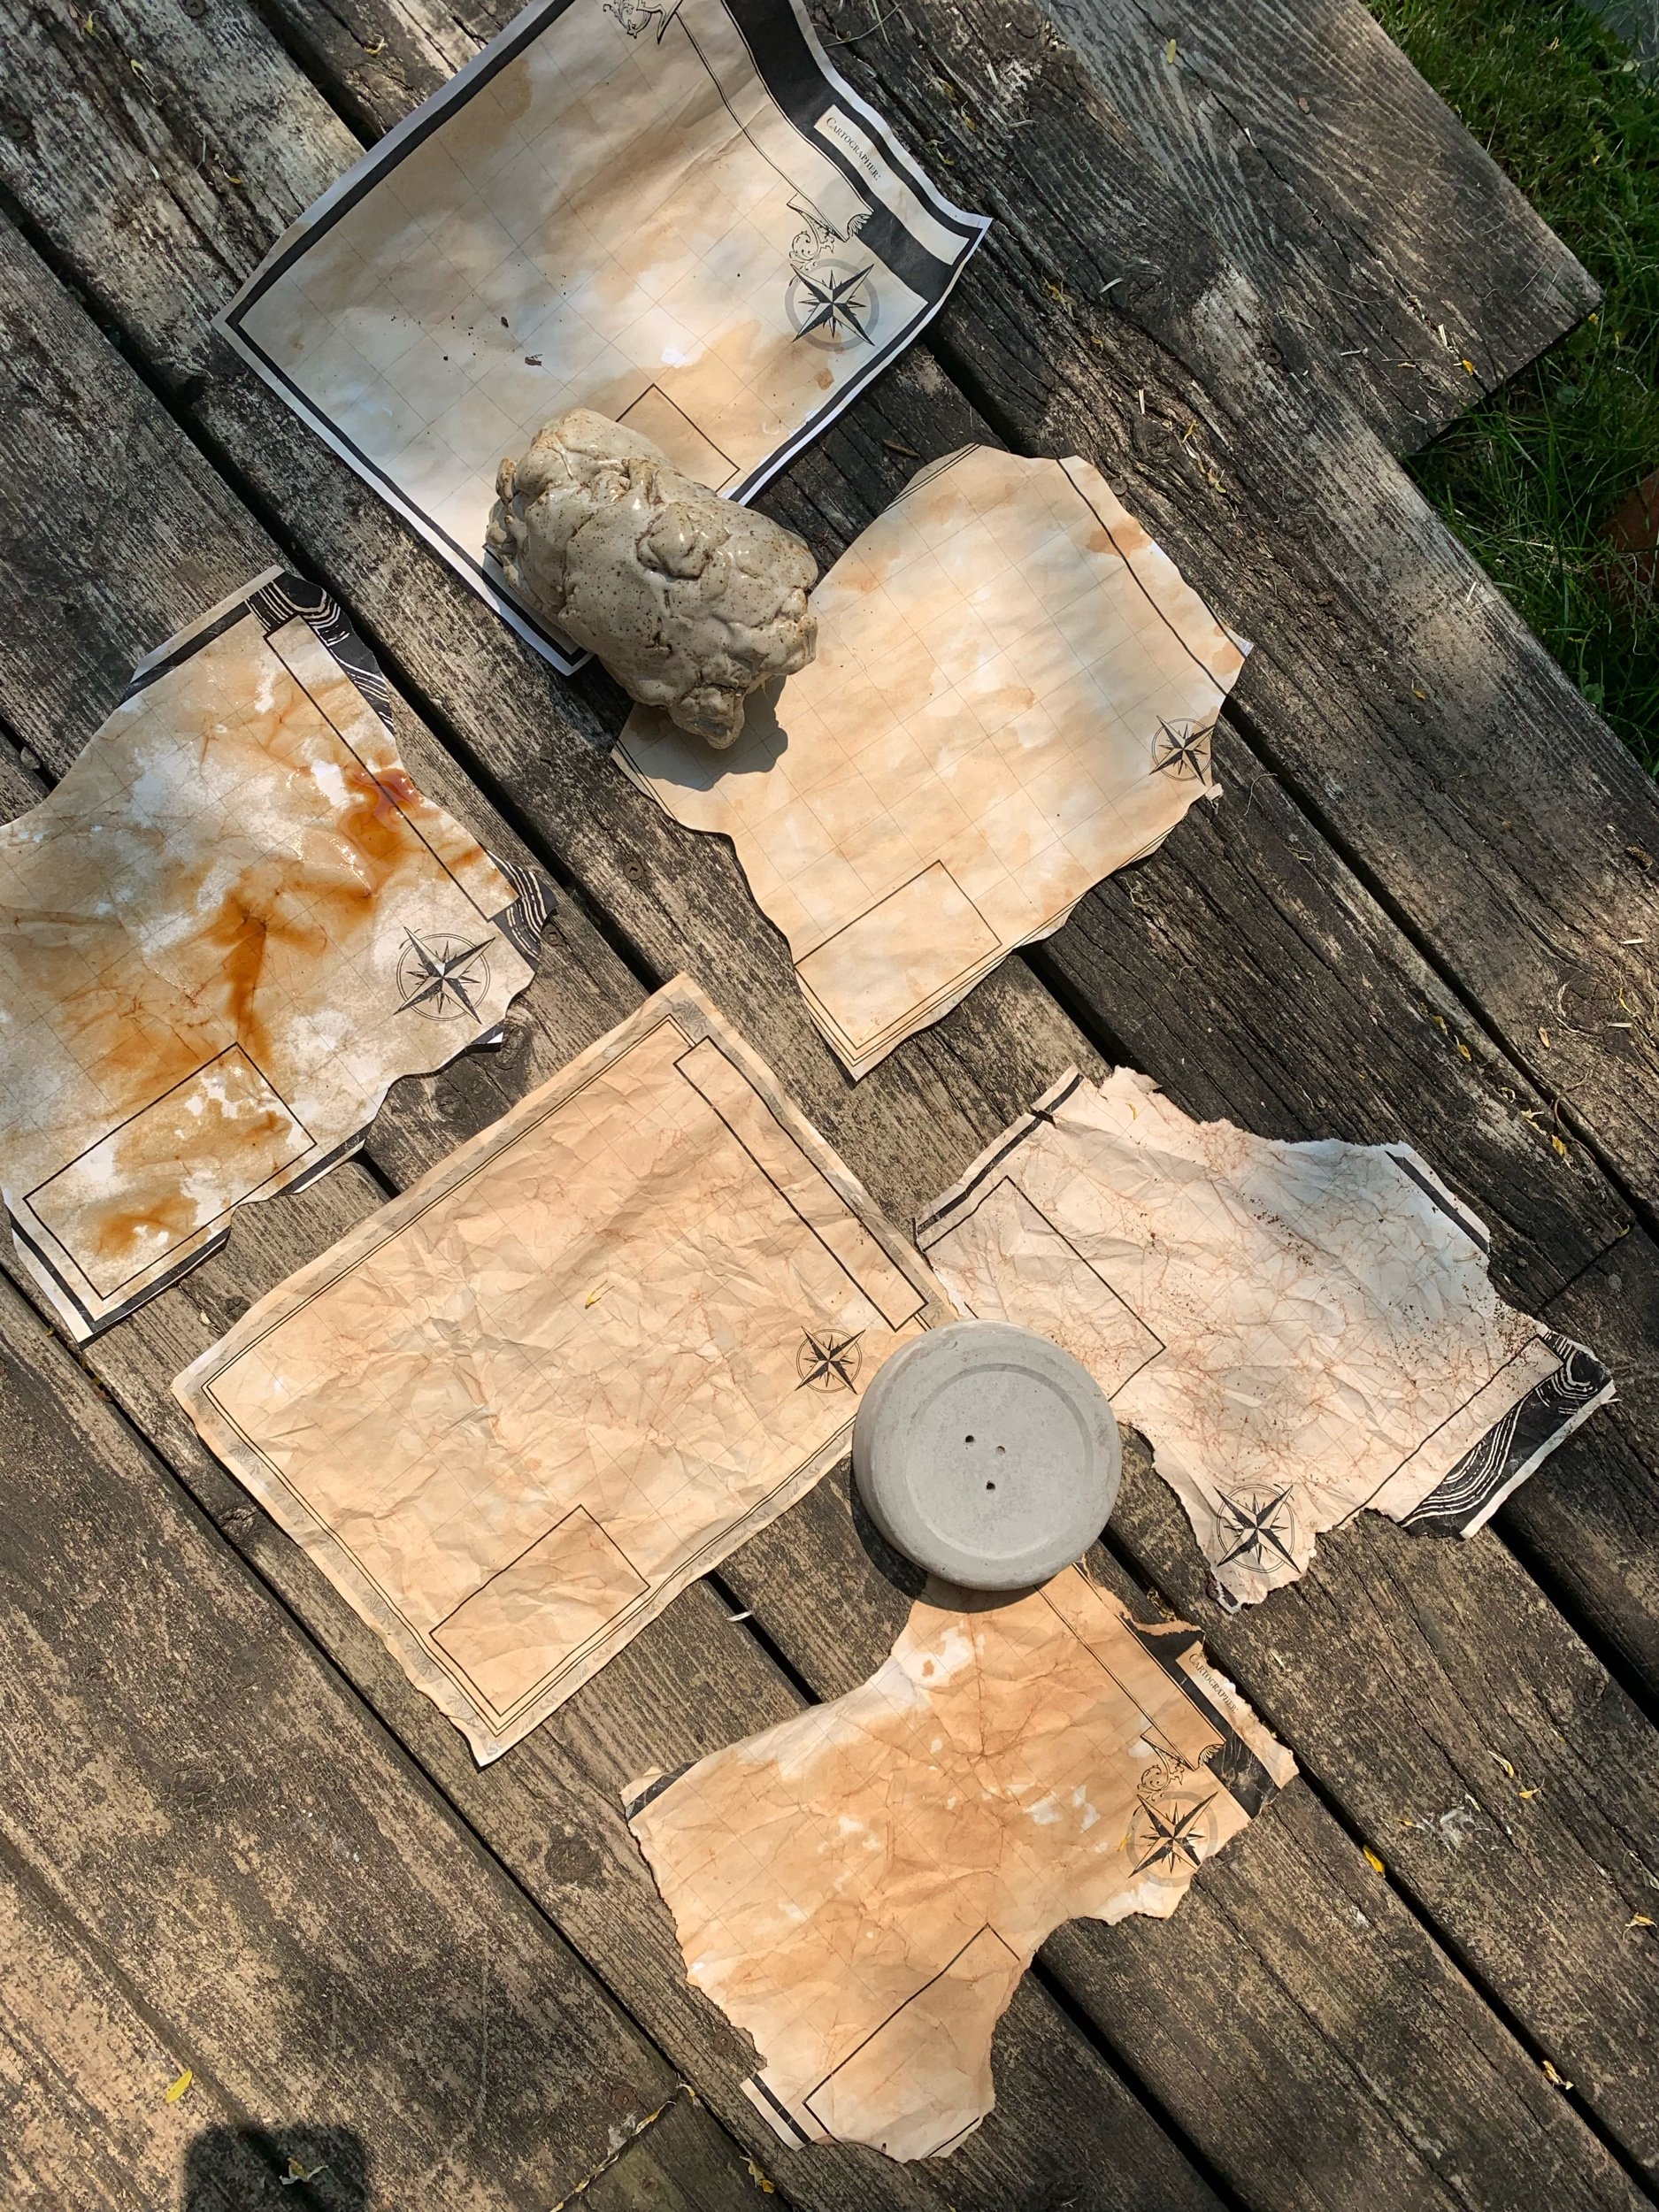
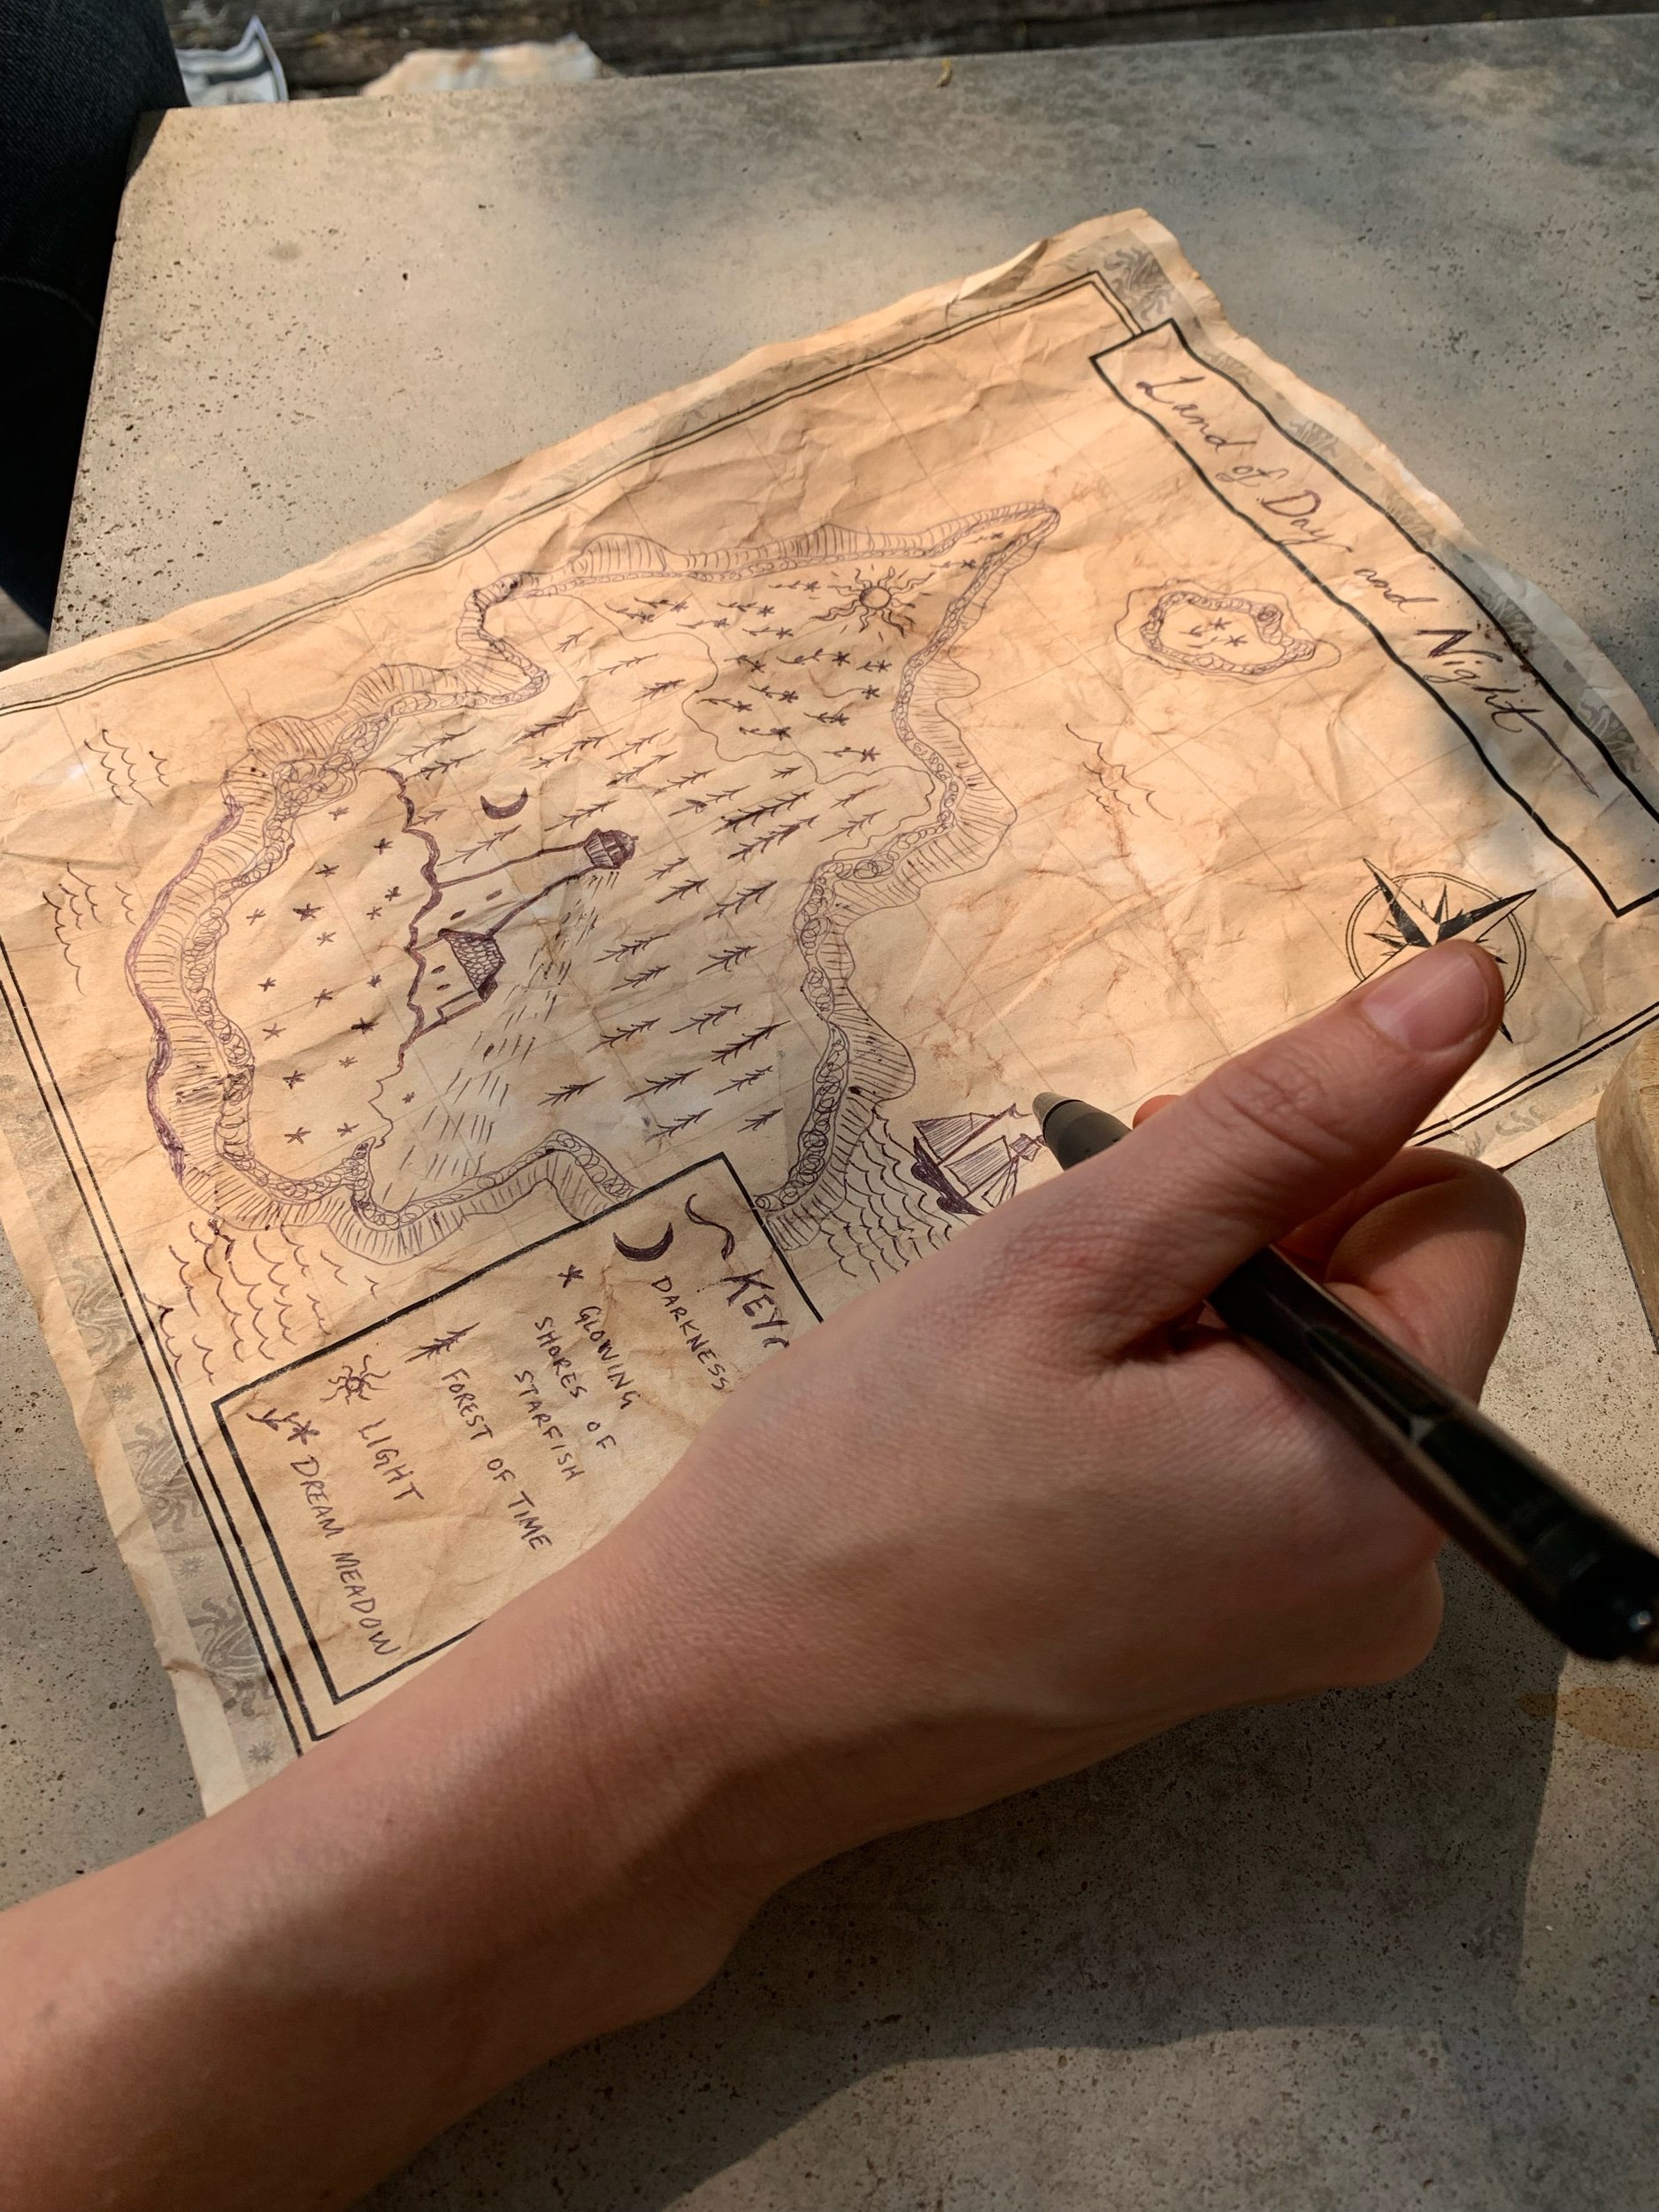
I Am a Meadow Mermaid - Imaginary Maps
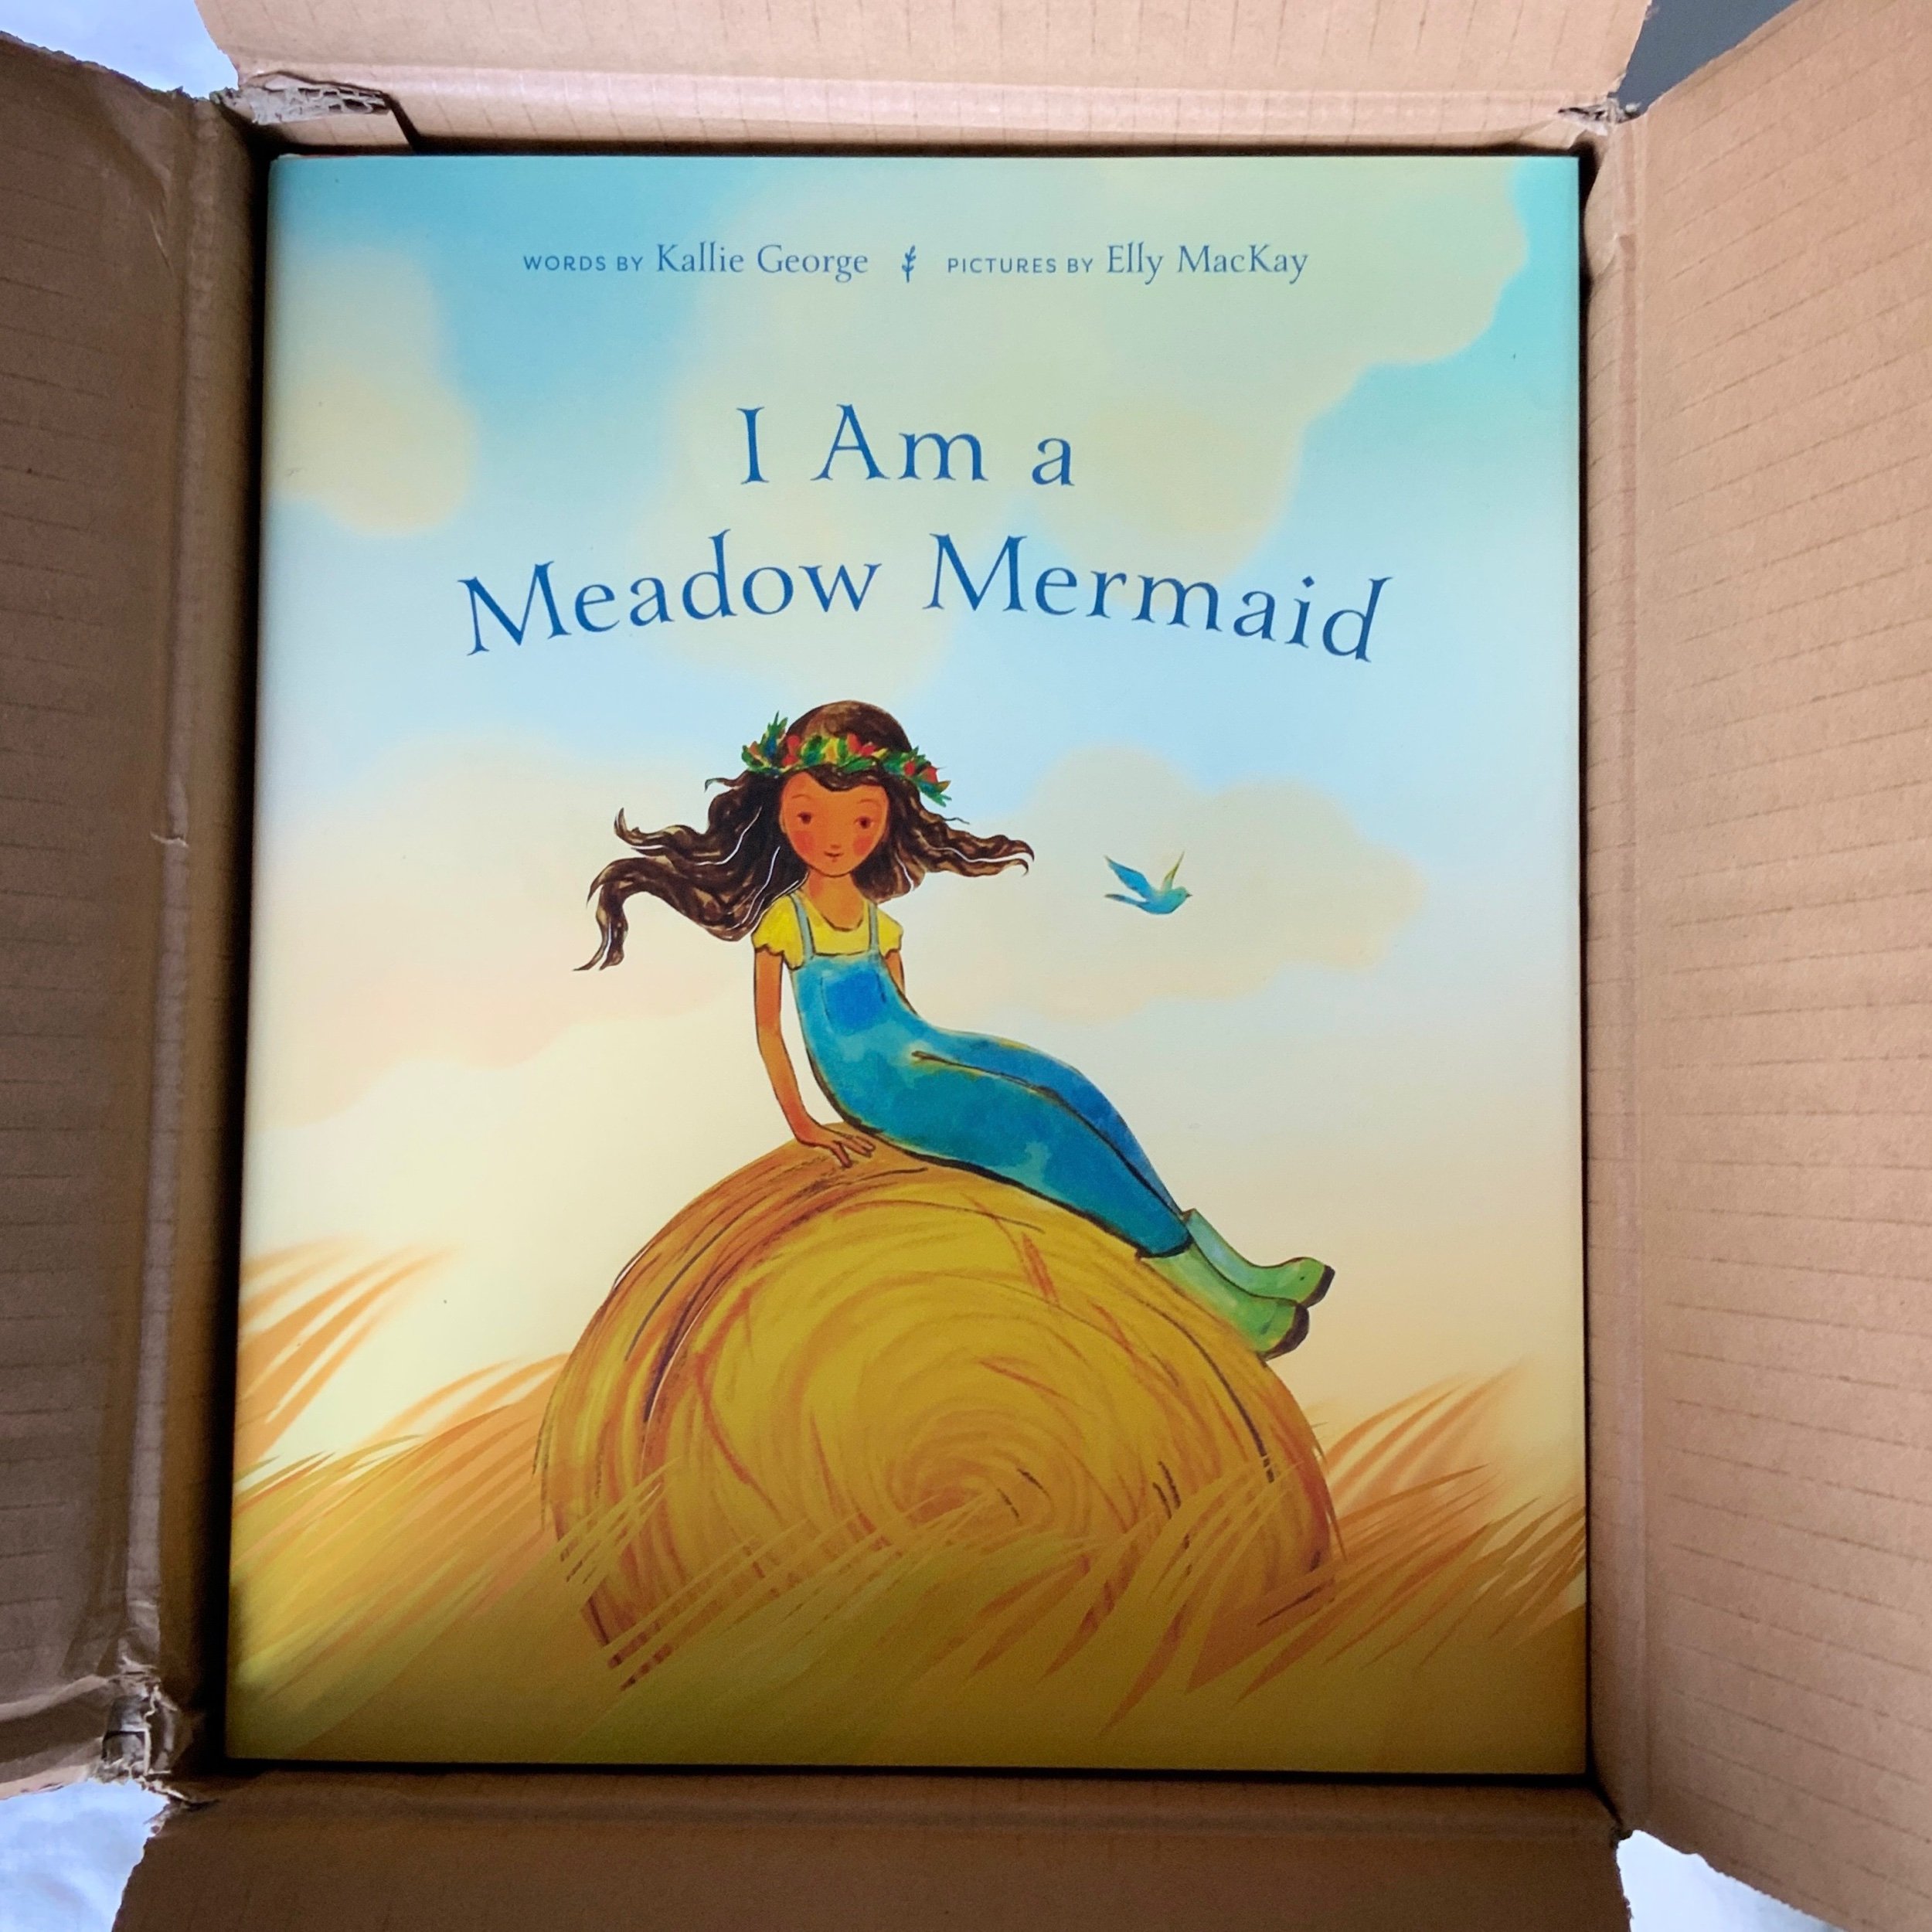

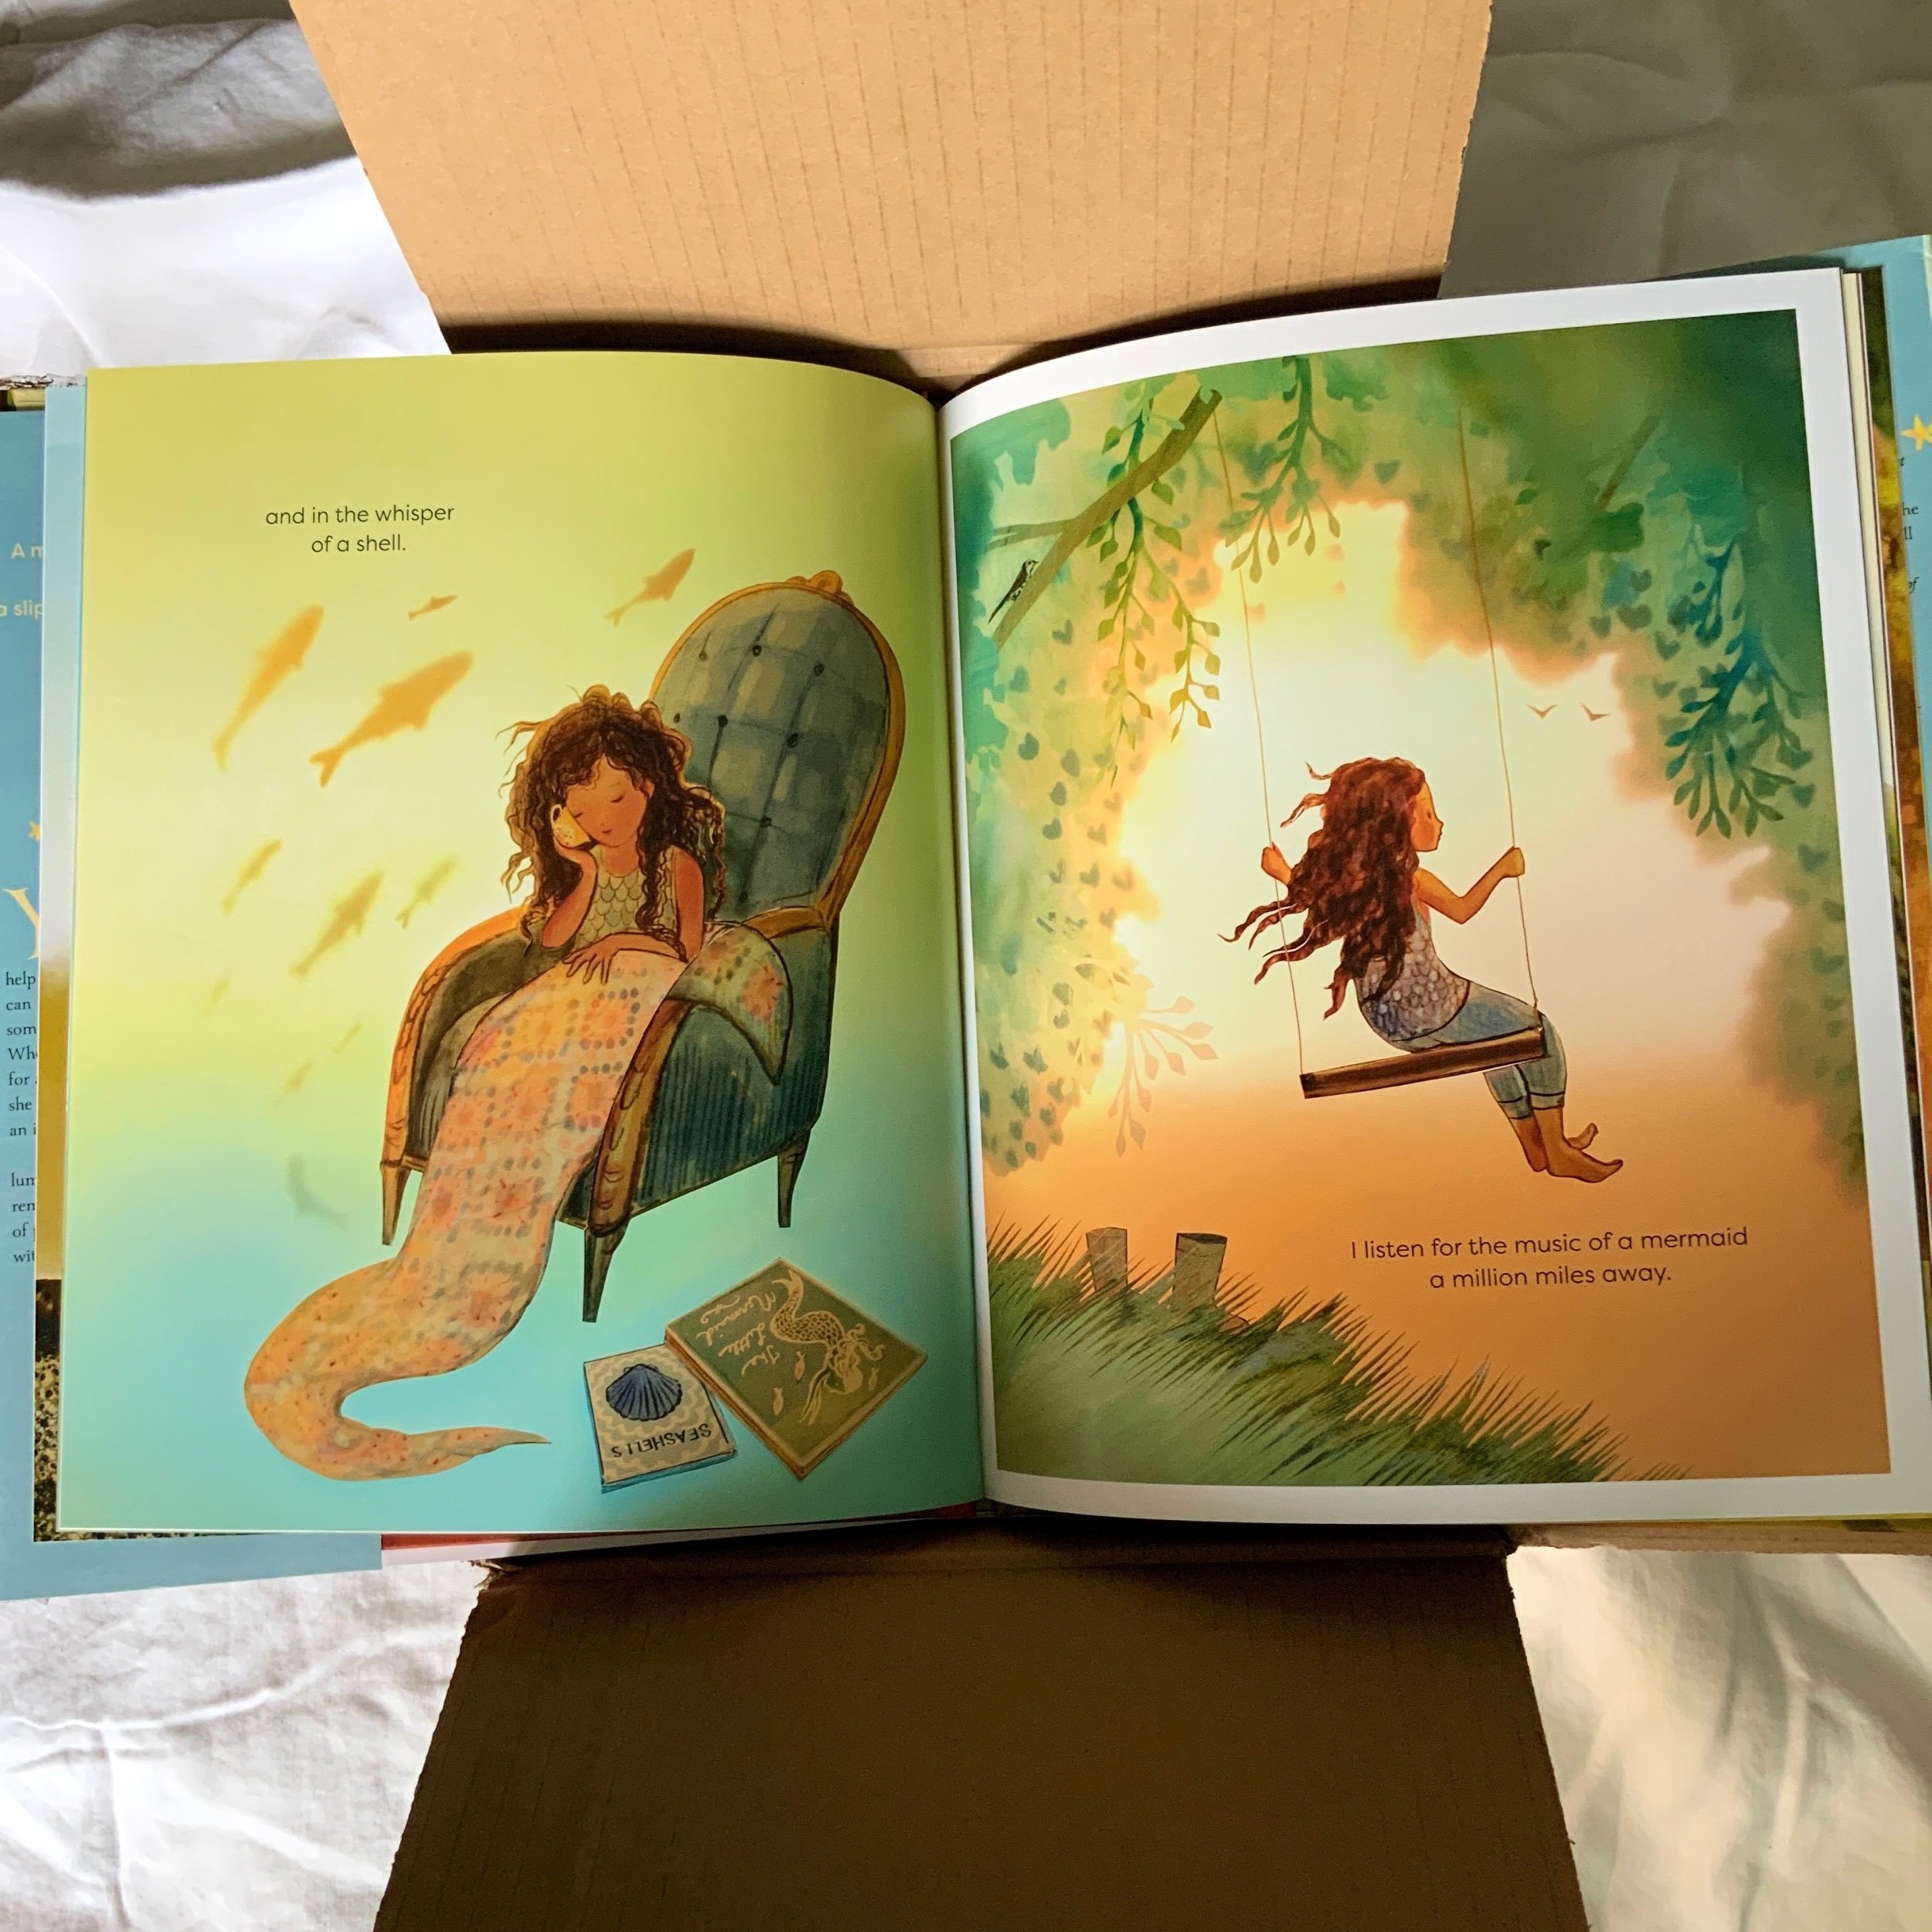
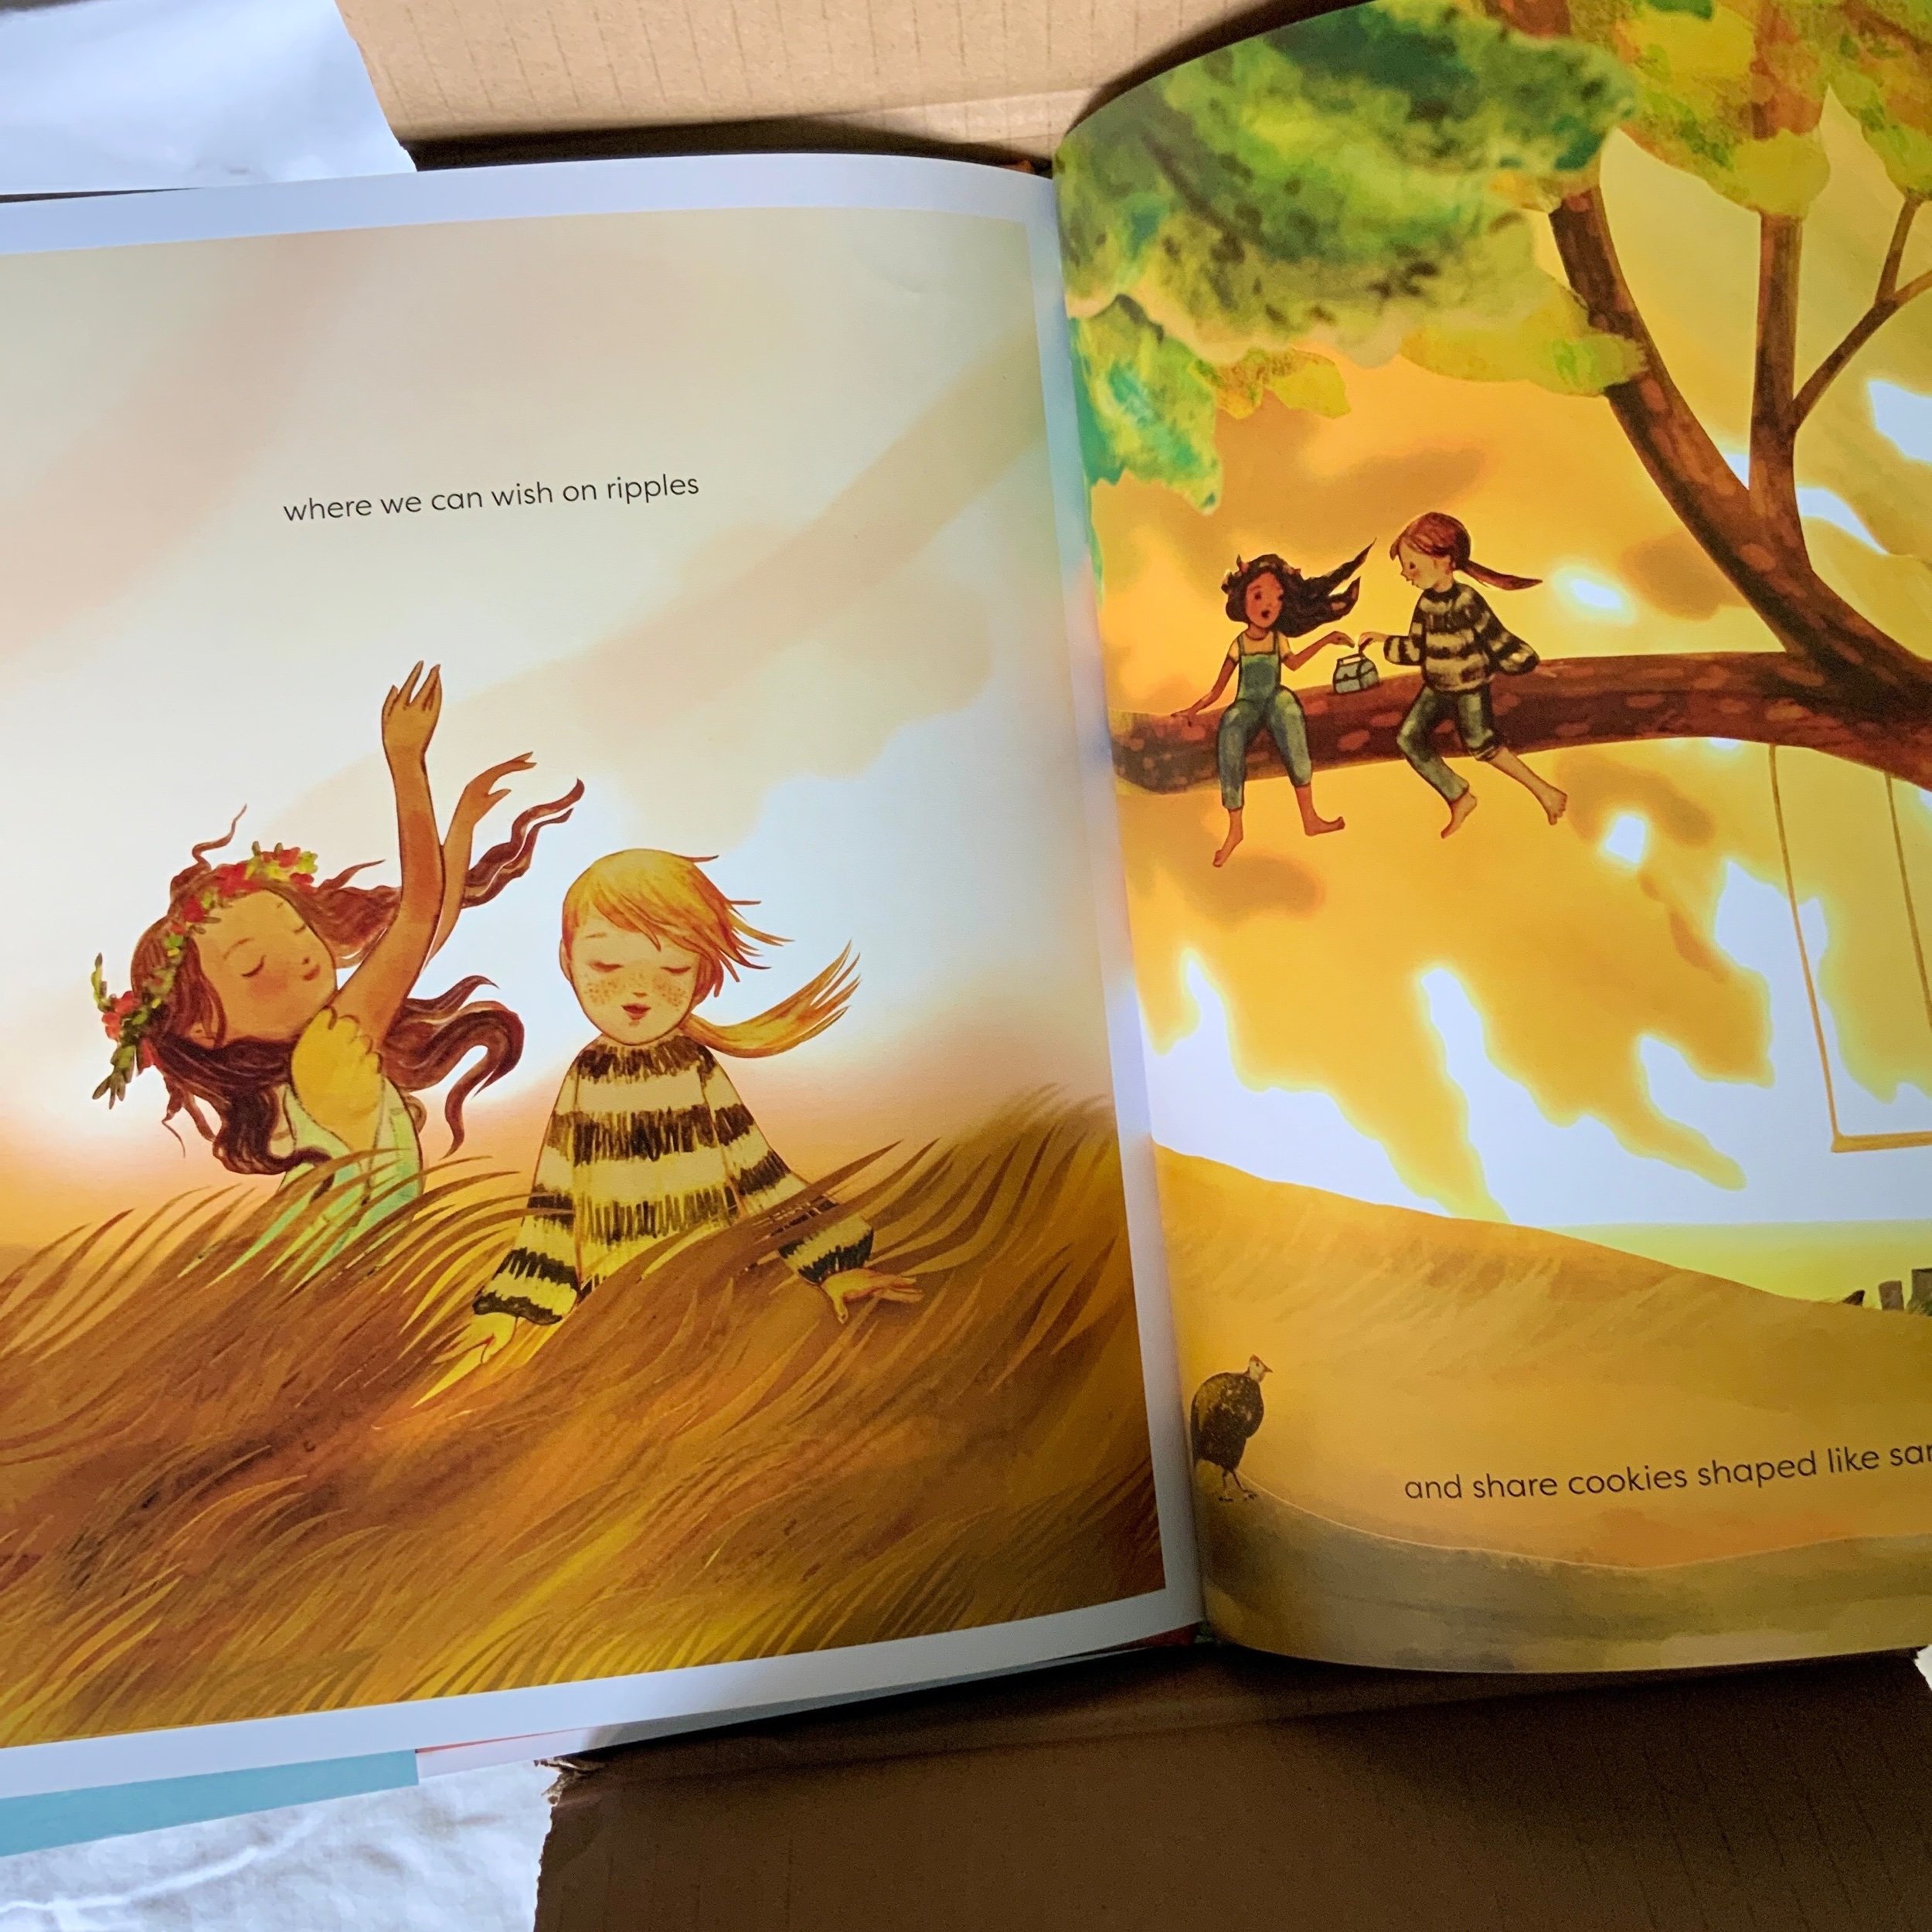
After reading I am a Meadow Mermaid, create your own fantasy map. What does your imagined world hold? Do you know where the seahorses play? What shape will your island take?

Print out a map from the link below.
Make some tea. Make sure it has cooled to the touch before using.
Optional - crinkle up your map. This will create stained crease lines.
Optional - tear edges of map.
Run the teabag over the surface of the paper. Do the back as well to prevent curling.
Dry
Draw whatever you wish - water, land, monsters, forests, etc.
Name your imaginary place.
Create a legend/key to help travellers find their way.

Hidden Treasure Activities
A Day at the Beach - Pop Up Card


Instructions:
Fold an 8.5x11 inch paper in half.
Measure 1 inch in from each side and 2.5 inches up from the fold.
Cut along each line and fold the middle up.
Push the middle through the centre and close.
Measure 1 inch in from each side along the folded middle crease and one inch up.
Cut through the 2 layers, then fold the new flaps up.
Push the new flaps through the middle. Image 7 shows the back.
Image 8 shows the tiered front.
Cut 2 strips of paper, 2 inches wide x 8.5 inches. Then, cut a wavy edge.
Colour the water strips. Glue the water to the pop up layers.
You could add a person, boat or ball to the scene or maybe your dog! Make sure it doesn’t stick out when you fold the card.
Decorate the sand and sky. Fold another sheet of paper in half and use it as a backing for the card. You could add a note. Here are a few ideas: See you this summer! Meet you at the beach! See you next summer!
*** To see a VIDEO of how to make it, visit my Instagram. ***
I love pop ups! My mom, Joan Irvine wrote books on making pop ups when I was a kid. Check out her books.
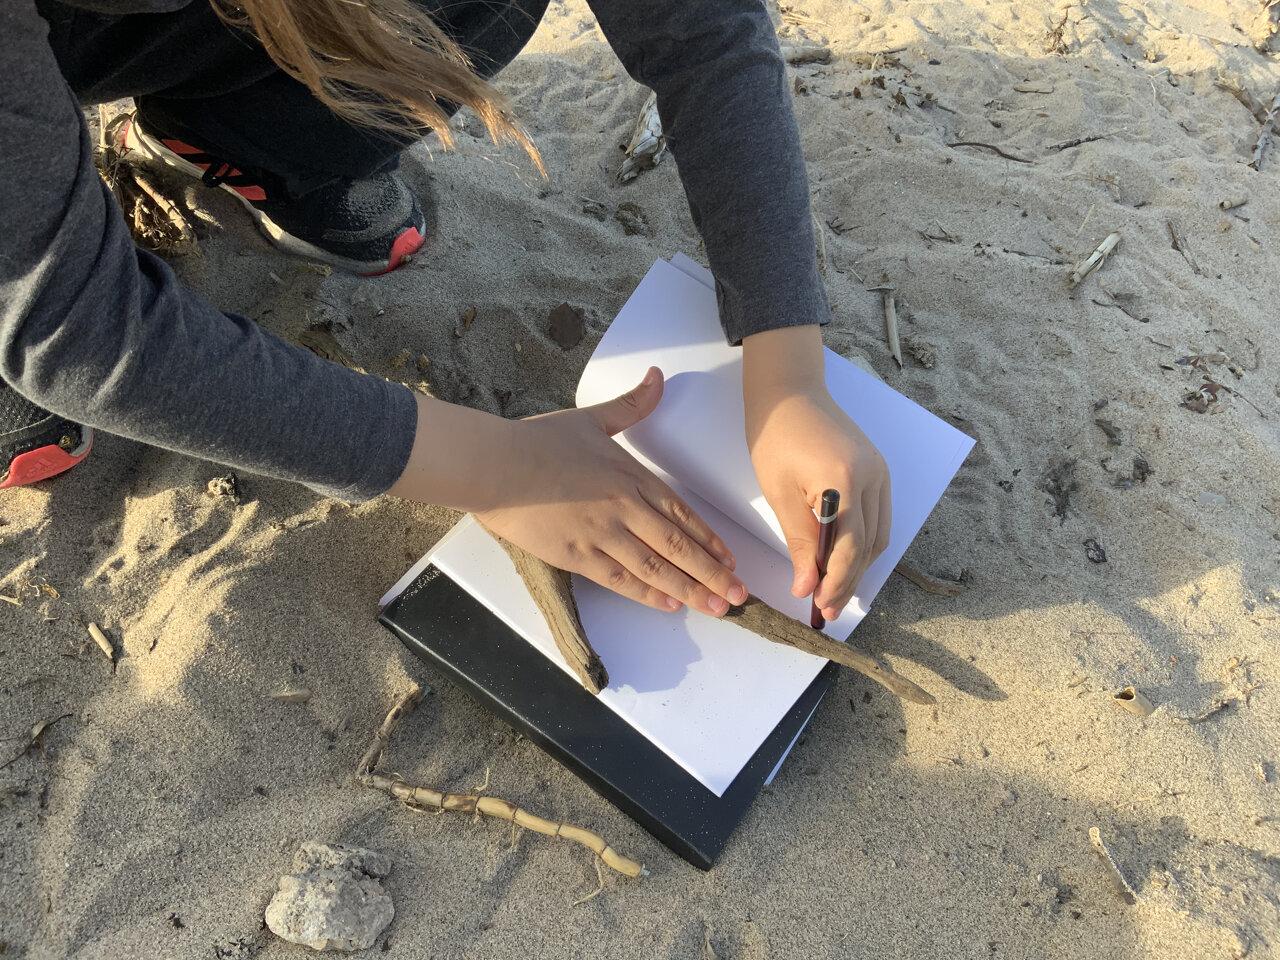
Hidden Treasure - Field Studies

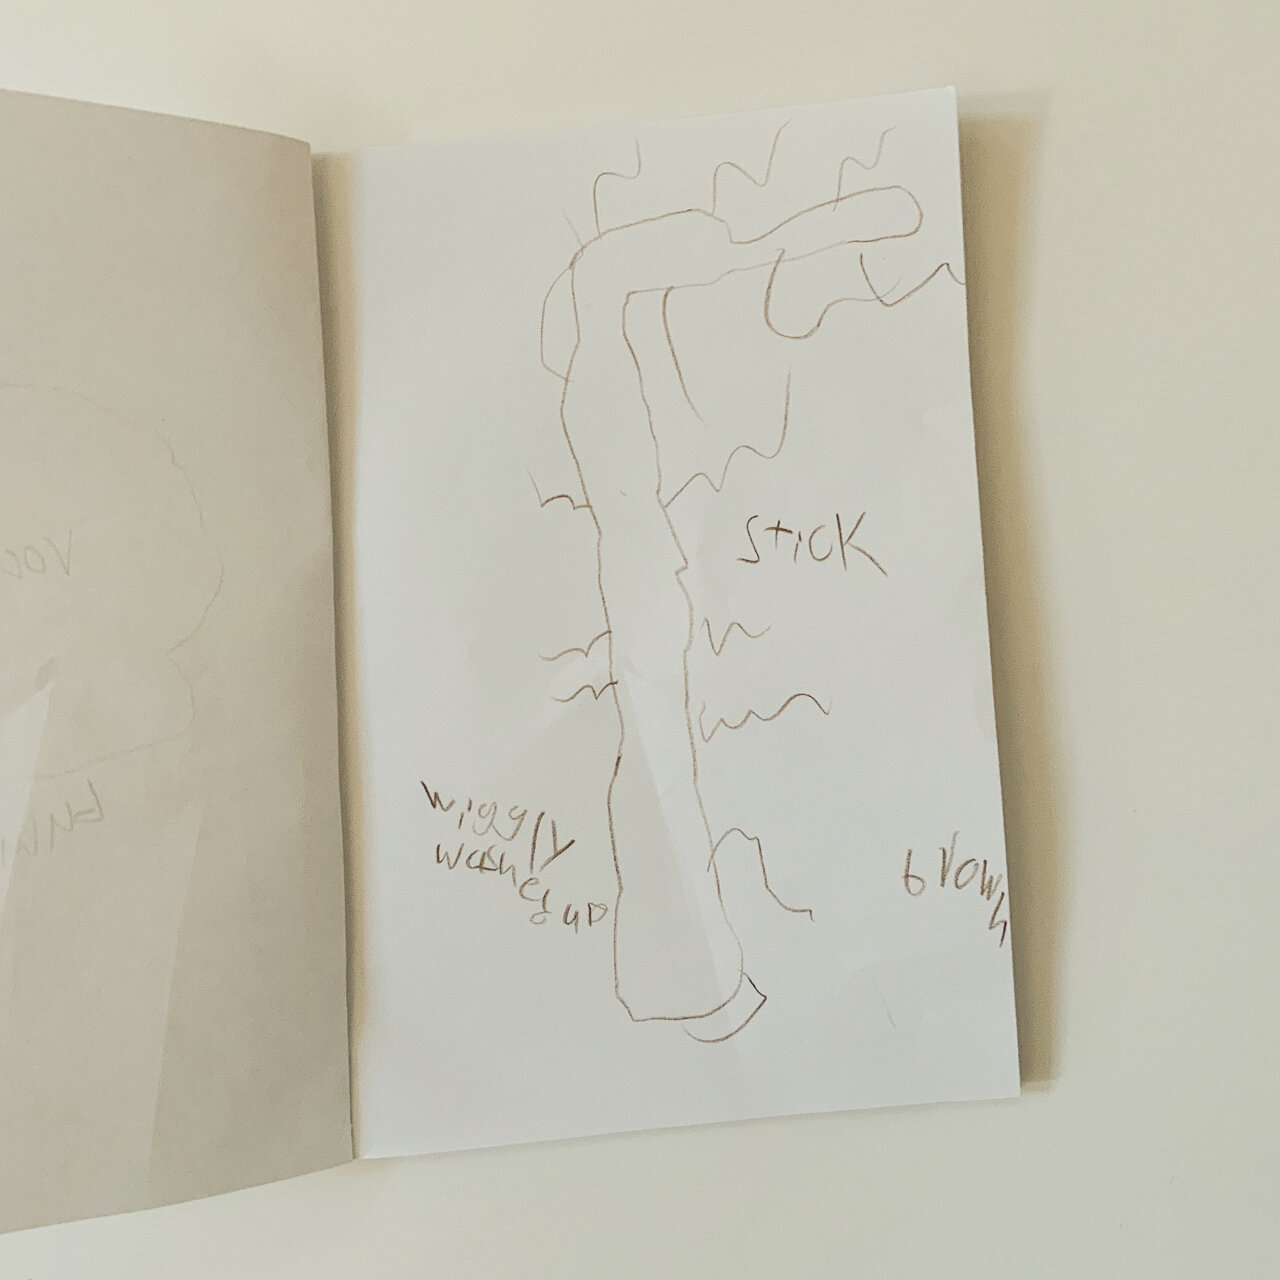
For me, the joy of looking for treasures comes from seeing the beauty in each thing and looking closely. What is the texture? The shape? The colour? You can note the smell or anything else that makes it unusual. It is important to know when a treasure can come home with you and when it should stay where it is. This is a way of collecting treasures and letting them remain where they are. Note the location of your treasure in your field notes. My son drew his treasures in a little notebook. You could use a notepad or use this PDF with space for 5 treasures:
Field Note PDF
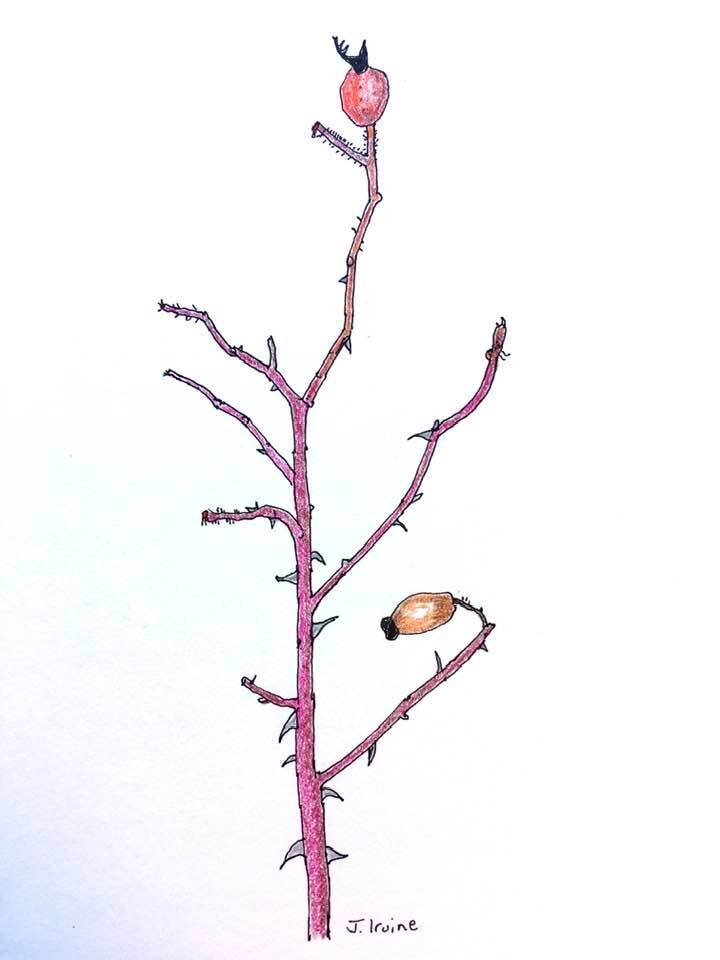
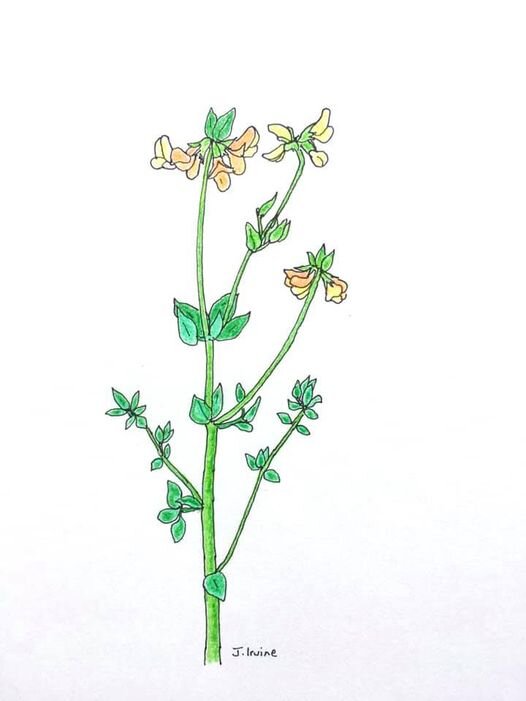
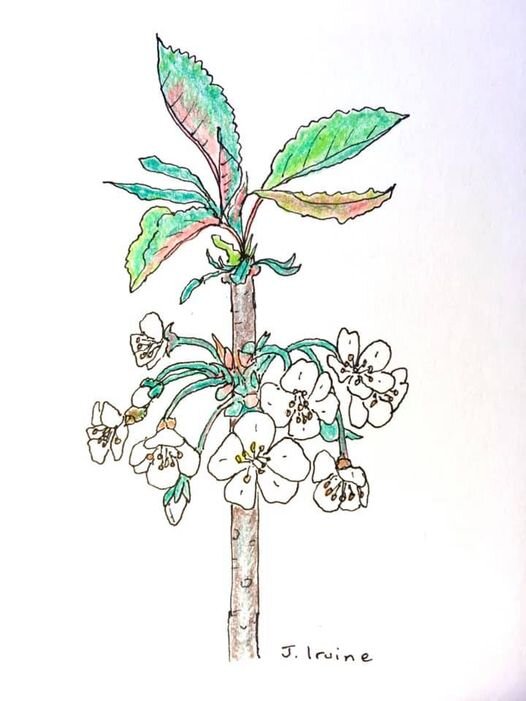
My mom looks for a treasure every day in the fields by her home and shares her field notes on Instagram. Here you can see her drawings of: Sweet Briar, Birdsfoot Trefoil and Pin Cherry.

The Secret Fawn
Tunnel Card - Secret Message


I love tunnel books. It is what got me started. They can be tricky to make though. This design is nice for its simplicity. You just need one piece of paper (any size), some scissors and something to draw with.
Fold the paper into 8 sections (Fold each direction and then in half.)
Cut along the middle until you reach the last section (where my finger is pointing).
Cut away 2 sections on one side.
Fold the long side up like an accordion.
In the first three sections of the accordion, cut jagged holes. The first one should be largest, then a bit smaller and then smaller still.
-Next set of photos-
Fold the long side down. Then fold the accordion in.
Draw your fawn in the middle of the holes. You can lift it to better see.
Colour the facing pages.
You can write on the left but also under the tunnel! Do you have a secret to share?
Design the front of your card too!
The Secret Fawn - Fawn Mask

For the book launch of The Secret Fawn, I quickly made this fawn mask. Perhaps your little one wants to play dress up too? They can colour their own or you can print one already coloured.
Download the PDF you’d like. It is best to print it on cardstock (8.5 x 11 inch). You may want to print it slightly smaller for little kids. This one when printed -fit to page, fits an adult.
Cut out all shapes, including eye holes (tricky). You may need to adjust the spacing for your child.
To make the ears, fold the bottom edges in and staple or glue. Then attach them to the upper sides of the mask with staples or glue. Antlers are optional of course.
You can attach a stick to the mask with tape and hold it up. Or you can attach ribbons or pipe cleaners to the back.
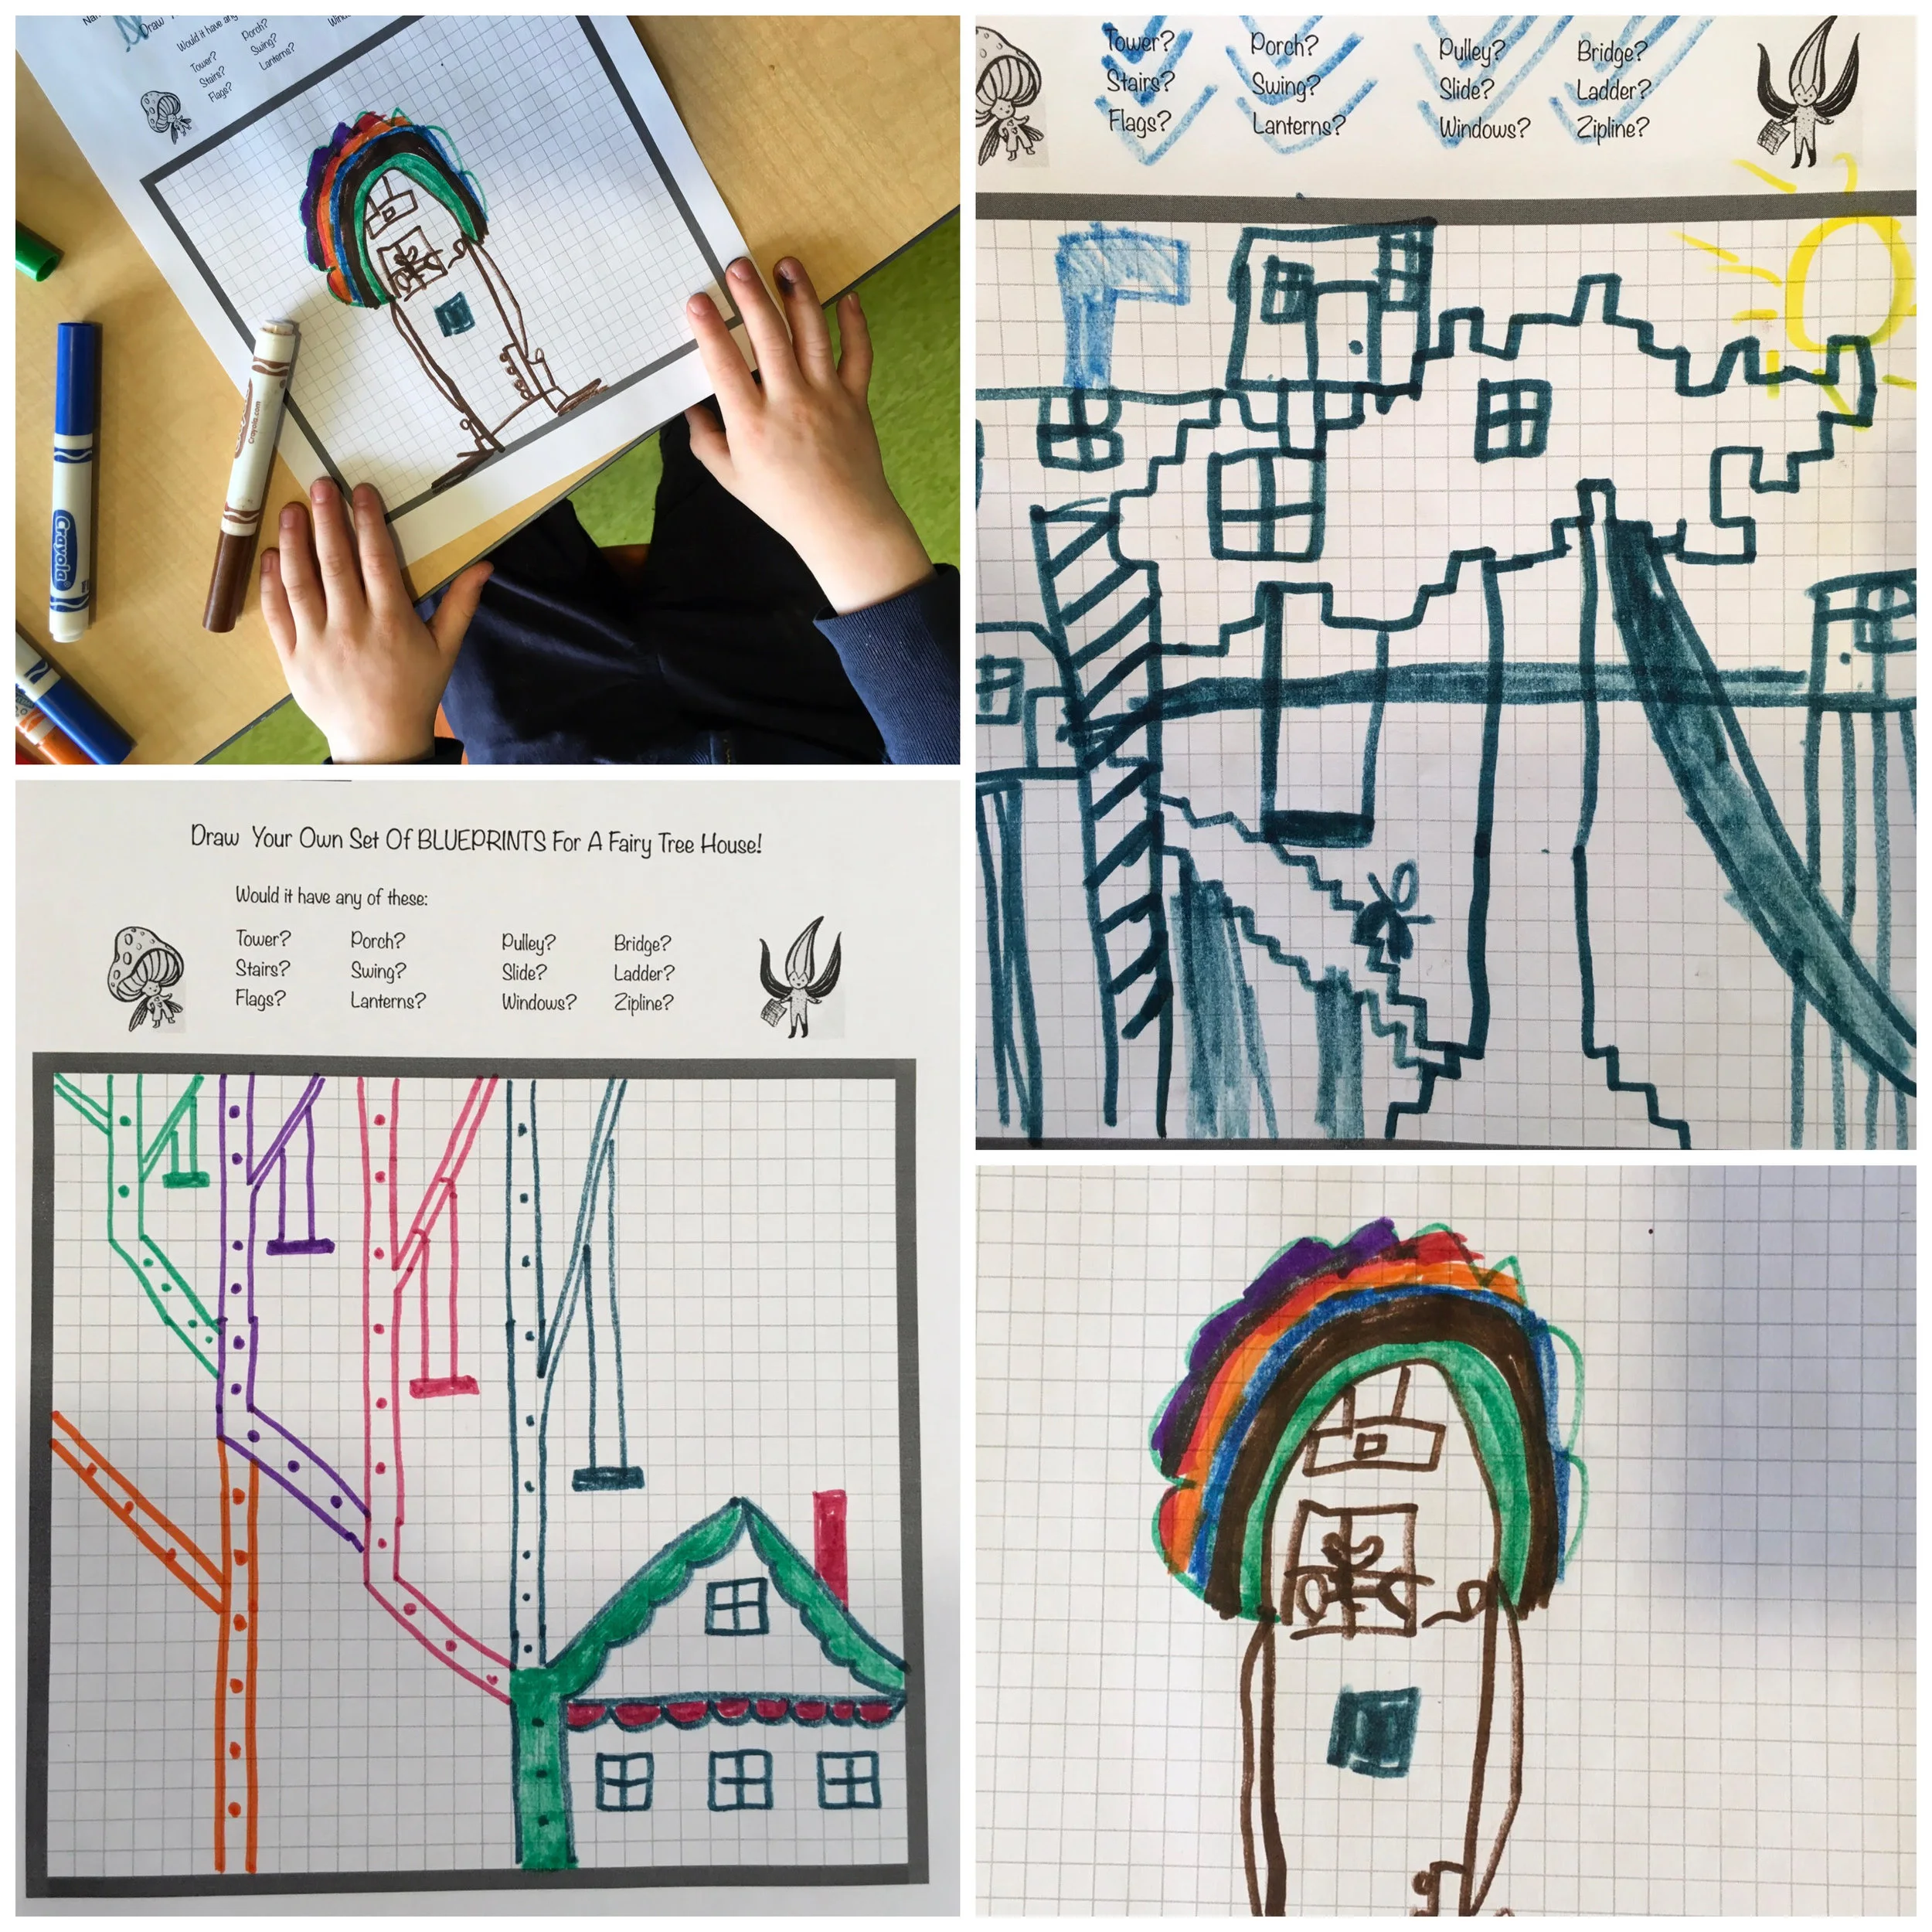
The Tallest Tree House - Blueprints

Design your own fairy tree house. Come up with a plan by creating some blueprints. (Teachers - a STEAM activity.)
Will your tree house have a slide, a swing or maybe a tower? Follow up by sharing your plan with a friend. Can you combine your tree houses? If you have building materials (Lego, blocks, boxes and paper rolls or natural materials) try building your tree house.
To create the tree houses in the book, I used foam core and covered the outside with metal (similar to tinfoil) and thin wood strips (similar to stir sticks).


Red Sky At Night - Activities!
Meteorology
Interested in the science behind the sayings in Red Sky at Night? Meteorologist, Phil Chadwick dives deeper for us, here: http://philtheforecaster.blogspot.com/
Fish Windsock
We used plastic tablecloths to make our windsocks, though the kids found it slippery to cut. I'd suggest using waxed kite paper if you have some.
We folded our sheets in half. The fold becomes the bottom of the fish. The rest of the fish was drawn with magic marker.
Packing tape was used to tape the top edges (but not the ends).
Scales, eyes and fins were attached with tape.
3 Ribbons were attached to the mouth and tied together about 2 ft from the fish.
We had to run on a windless day with ours!


Paper Weathervanes
We used black cardstock, straws, wire, tape and a base (could be anything flat) to make our weathervanes.
First we drew our shape with pencil.
We cut the shape out and attached a straw to one side, taping the top of the straw closed.
Next, we curved the bottom of the wire (floral wires from the dollar store) into a flat circle, leaving most of the wire long.
We put the straw over the straight part of the wire.
Then, we attached the curved part of the wire to some matte board.
These looked so great. The kids were really proud of them. I love this fish my son made!
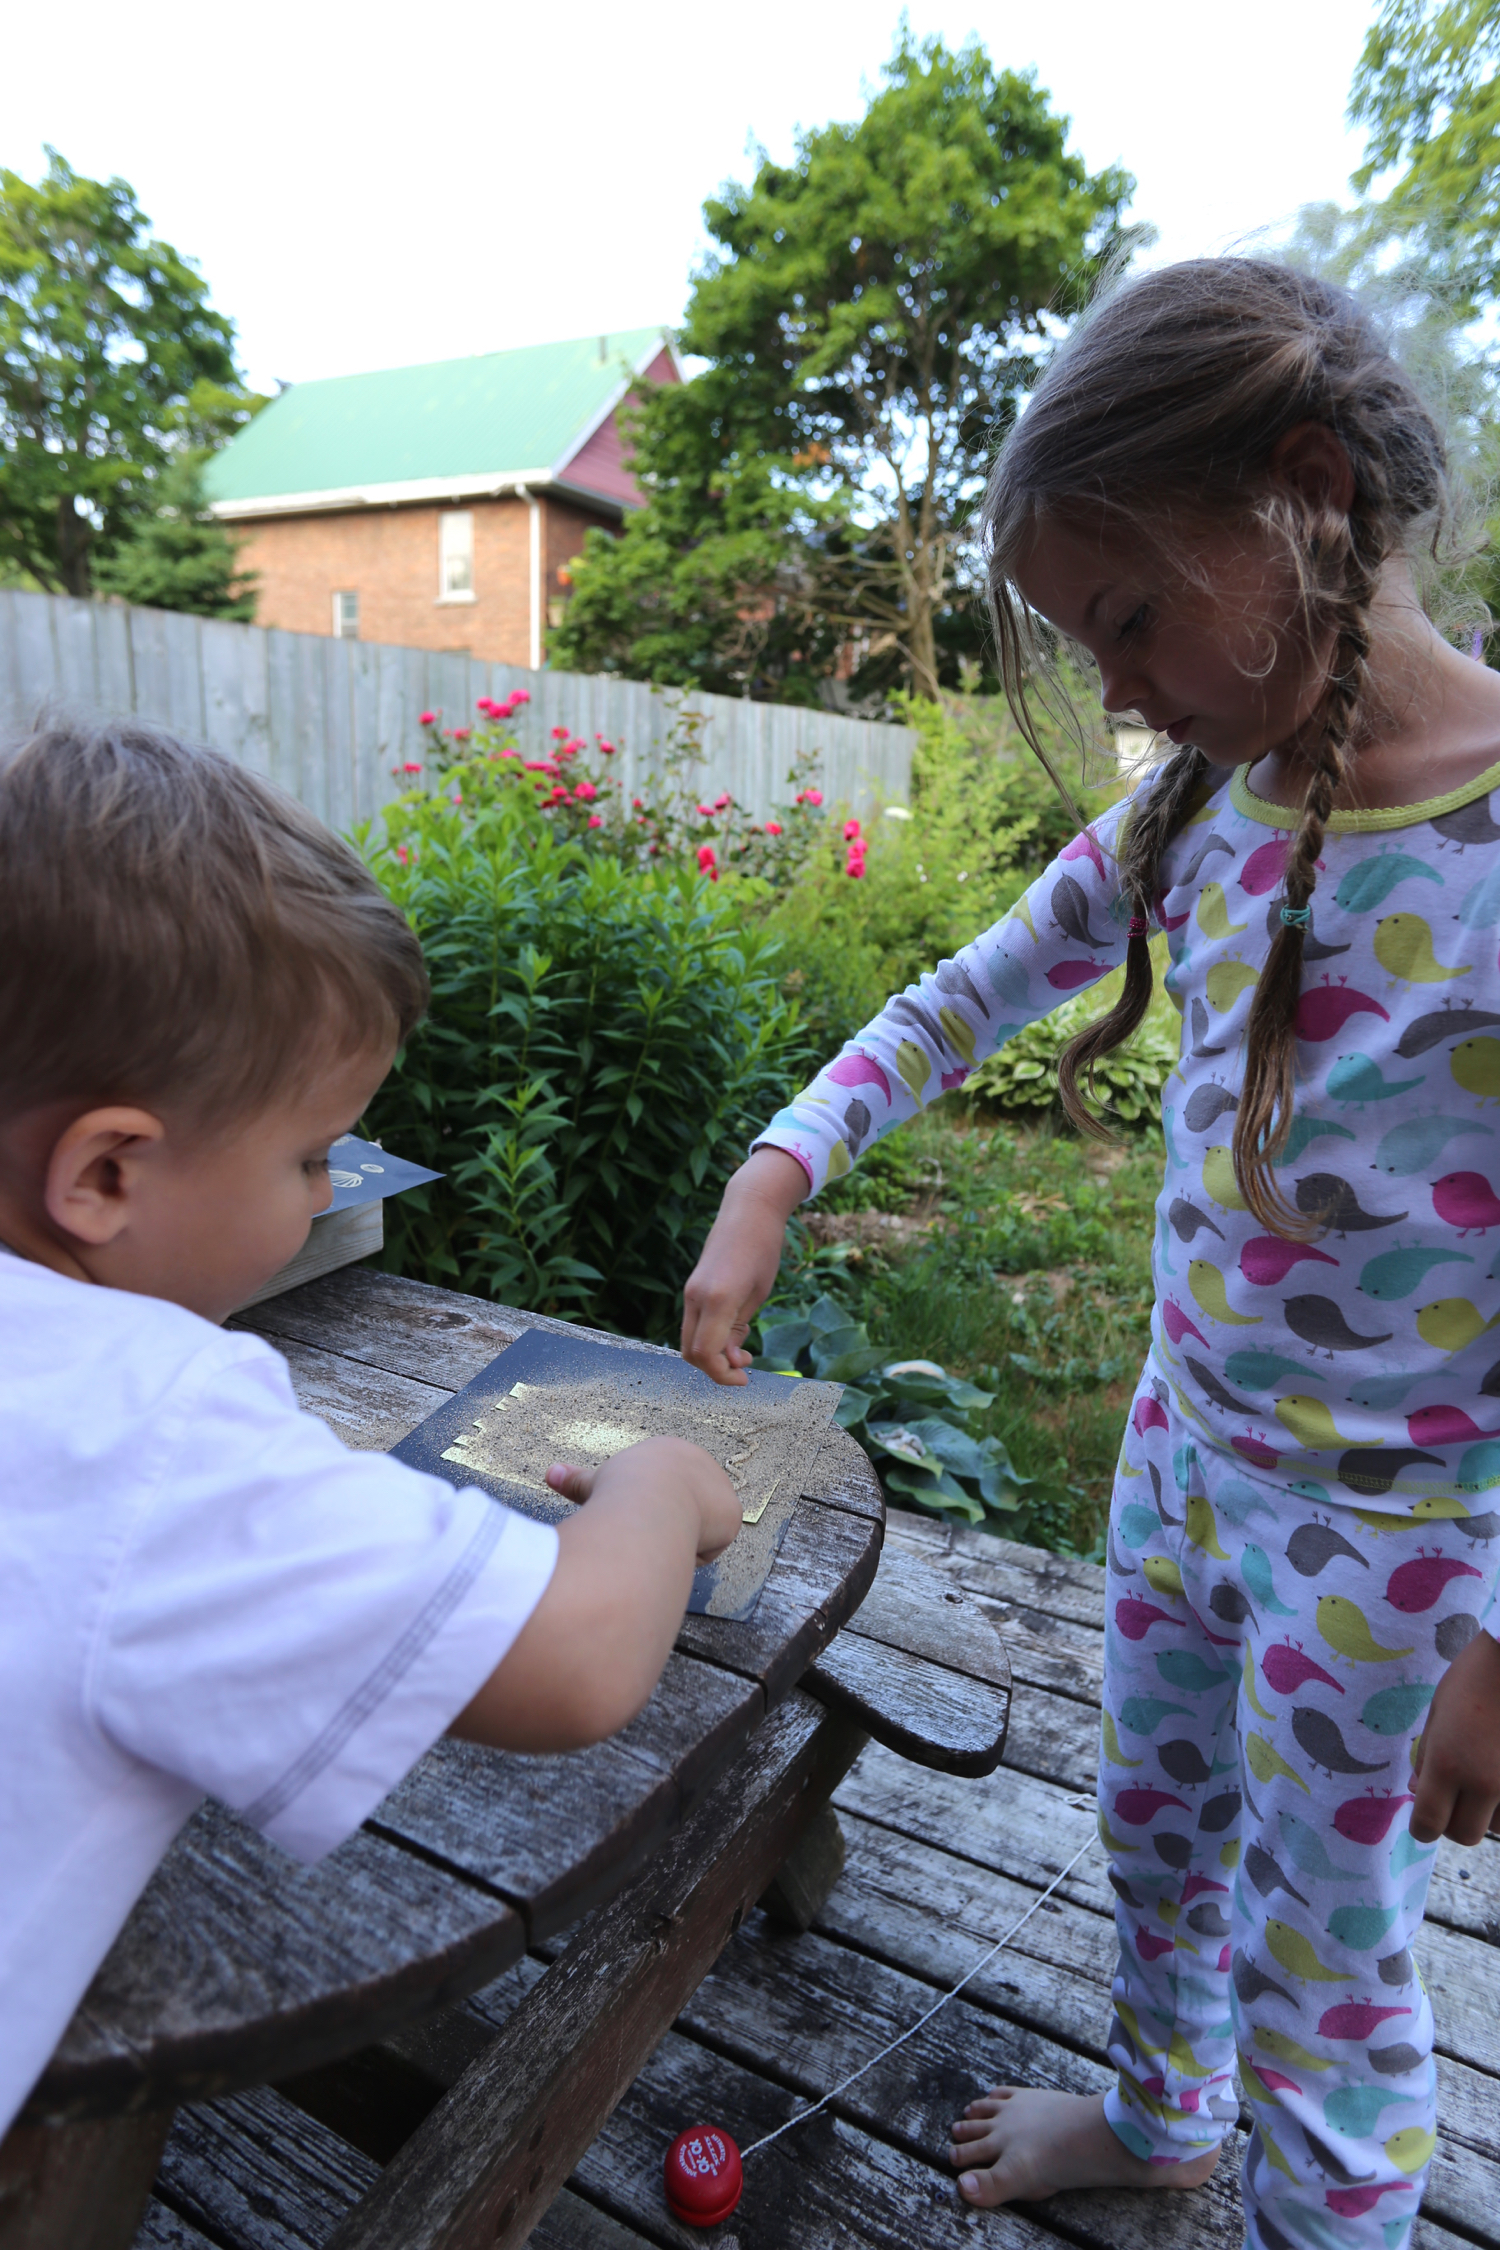
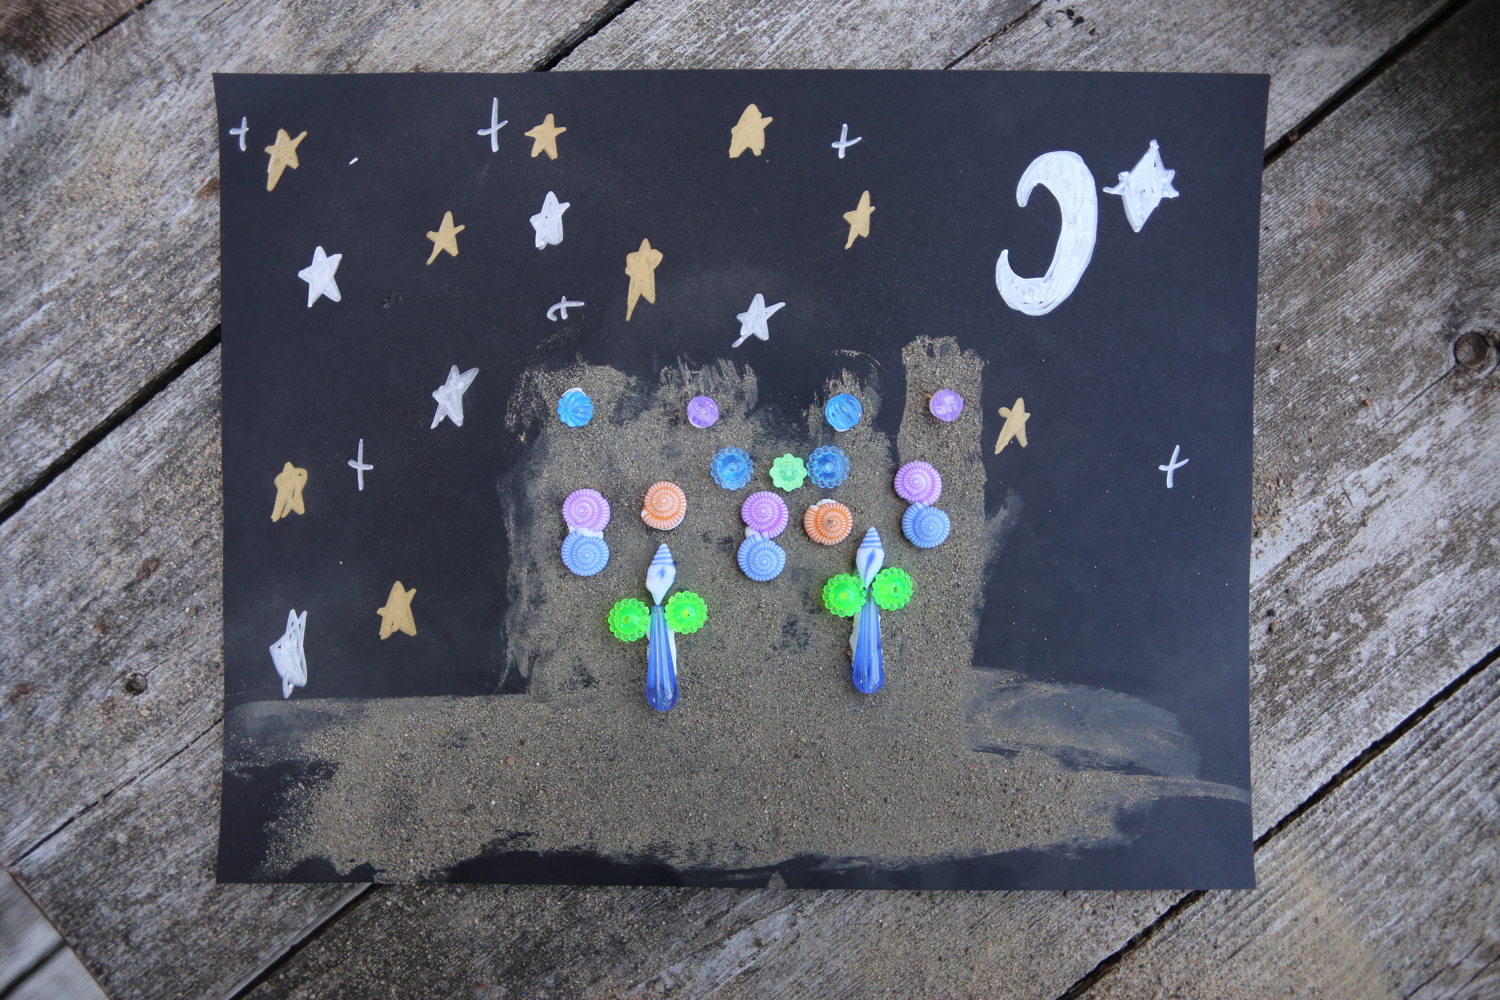
Beach Baby Activity - Sand Castle Painting
What You'll Need
cardstock (black is nice to show off the sand)
markers (we used gold and silver)
gluesticks or white glue
sand
beads or shells
We used black paper, drawing our castle outline and details with silver and gold pens.
We covered the castle area with glue.
Sand was poured over the glue and then shaken off.
The beads were added with white glue after.
If you want to keep the sand from coming off, you can spray it with fixitive.
Butterfly Park Activity - Magnetic Wand Garden
We used the lids of boxes that hold printer paper for the base of our gardens.
We then drew flowers and attached the pictures to the top of the box.
The magnetic wands were made from tongue depressors. We taped a magnet to the end.
The kids discovered polarity of sticking 2 magnets together! After making butterflies we attached a magnet to the back of each. Some worked and others pushed away from our wands.
Once our magnets were sorted, we had fun playing with our new toys, using the wand behind the garden to make the butterflies fly.

If You Hold A Seed Activity - Miniature 3-D Forest
This is an easy way to make 3D art with kids. First fold cardstock in half.
Then, fold each end into the middle and tape the seam.
Pop it up. You can cut indentations in the ends and fold them in on the sides to make it stay upright.
Make trees and attach them to the top of either side of your rectangular prism with tape or a gluestick.
Decorate the surface with an extra panel of paper or make draw roots!
My daughter added deer to create an animal habitat.

Shadow Chasers Activity - Shadow Puppets
Did you know there are hidden animals throughout the pages of Shadow Chasers? Look behind the two girls running and you will see a deer and bird. See how many you can find and follow up with this activity.
To make shadow puppets you can use any thick paper. We used black cardstock.
We drew animals and cut them out.
Some children made 2 piece animals that hinged in the middle with a brass fastener.
We pulled paper clips into L shapes and attached one side to the animal and one side to a popsicle stick.
We hung a sheet over a table and played with our shadow puppets.
Just a note to be careful with your light source. If working with kids, create a perimeter around the light or give them flashlights. Have fun!

Just for the love of paper…
Flexograms

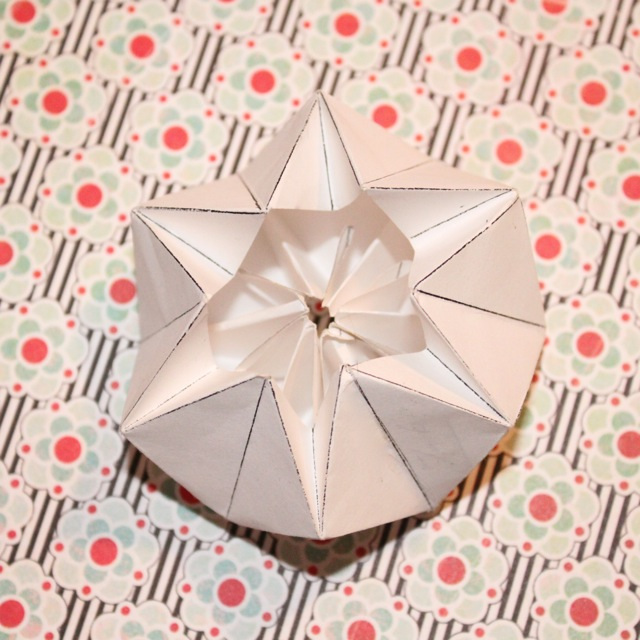
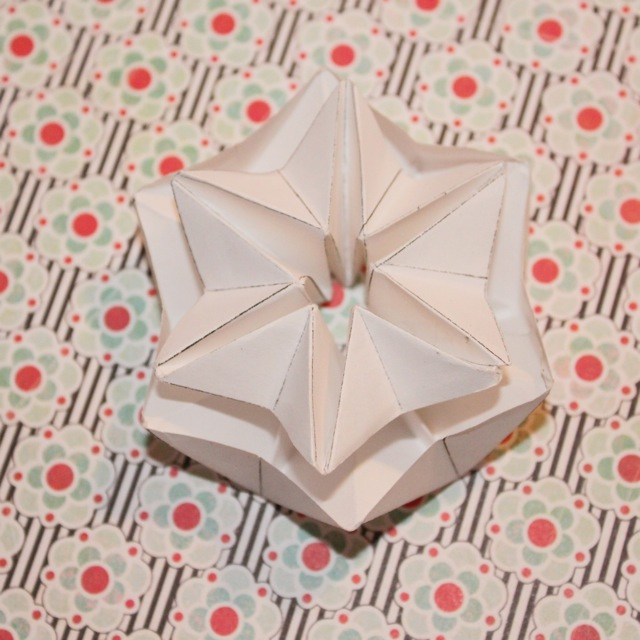
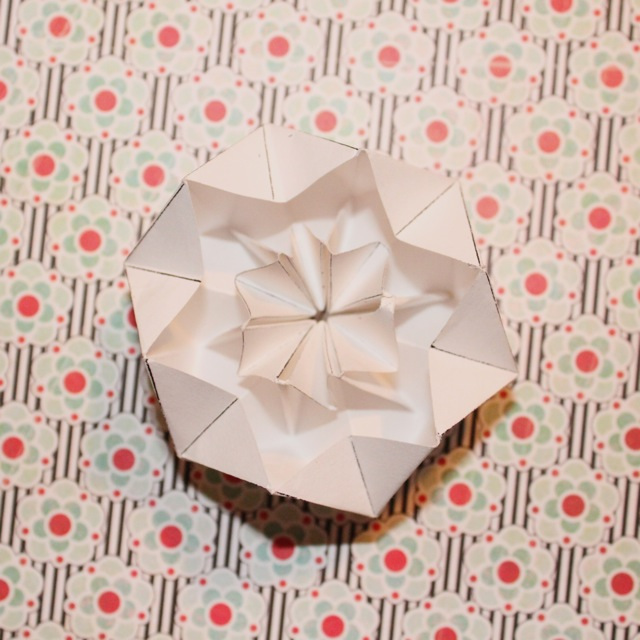
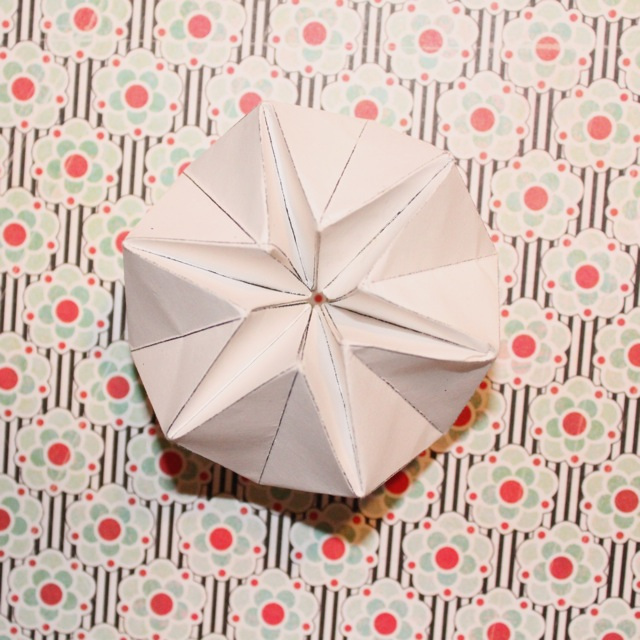
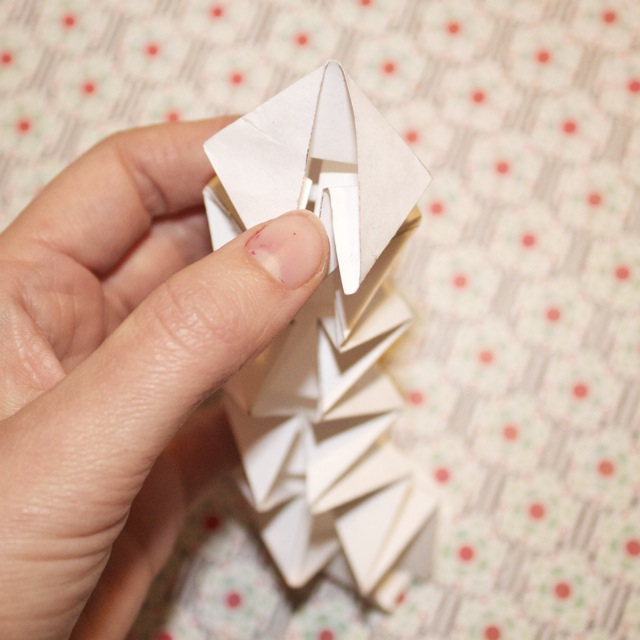

Flexograms are magical. Here is a template for one that turns inside out. I made this template for myself quite a while ago and came across it recently. I am not sure where I originally found the idea. This pattern makes 2 flexograms.
Cut 1 shape template out.
Fold along all lines in one direction and again in the other direction.
Push the edges in to form a diamond and continue doing so down the length of the paper.
Glue the tabs to the inside of the other end.
Slowly push the inside back through to the front and continue turning. It is a little tricky. It works beautifully with a different colour on each turn.

Click and Save, then print to fit paper.